
Mastering Elegant Cakes, Even on a Busy Schedule
As a working mom of two from the Midwest, my weekdays are a whirlwind of school drop-offs, work tasks, and getting dinner on the table. There was a time when special occasions meant last-minute runs to the bakery or feeling completely overwhelmed by the prospect of baking something truly spectacular myself. That all changed when I embraced the power of meal prepping. What I learned about batch-cooking and efficient kitchen management for our family dinners, I’ve applied to my baking projects, too!
It turns out, preparing an elegant dessert doesn’t have to be a source of stress. With a clear plan and a few smart techniques, you can create show-stopping treats that look like they came from a high-end patisserie, all from your own kitchen. This Classy Watercolour Ombre Baby Shower Cake is a perfect example. It’s visually striking, incredibly impressive, and yet, completely manageable for even the busiest of schedules. Think of it as a form of baking prep – breaking down the steps into manageable chunks, so assembly day is a breeze.
Whether you’re hosting a baby shower, a birthday, or simply want to create something beautiful, this recipe is designed to guide you every step of the way. We’ll focus on practical methods and organization, ensuring your baking experience is efficient and produces a stunning result. Get ready to impress your guests with a cake that’s as beautiful as it is delicious, without sacrificing your precious weekend time.
Table of Contents
- Mastering Elegant Cakes, Even on a Busy Schedule
- Why This Recipe Works
- Ingredients You’ll Need
- Step-by-Step Instructions
- Pro Tips for a Flawless Finish
- Variations & Substitutions for Customization
- Frequently Asked Questions About Ombre Cakes
- Final Thoughts: Your Masterpiece Awaits
Why This Recipe Works
This Classy Watercolour Ombre Baby Shower Cake isn’t just another pretty dessert; it’s a strategically designed recipe that delivers maximum visual impact with minimal fuss. I’ve streamlined the process to ensure that even if you’re not a professional baker, you can achieve a sophisticated outcome. It’s all about smart preparation and knowing the right techniques.
- Impressive Visual Appeal with Manageable Steps: The watercolour ombre effect looks incredibly intricate, but it’s actually quite straightforward to achieve. By breaking down the frosting application into distinct colored bands and then gently blending, you create a seamless gradient that looks exceptionally professional. This method eliminates the need for complex piping skills, making it accessible for home bakers.
- Make-Ahead Friendly Components: Like a good meal prep strategy, this cake can be prepared in stages. The cake layers can be baked days in advance and frozen, and the buttercream can be made a day or two ahead and stored in the refrigerator. This batch-cooking approach significantly reduces the workload on your primary assembly day, making the entire process stress-free and efficient.
- Budget-Friendly Elegance: Creating a custom cake from a bakery can be quite costly, especially for a design as detailed as a watercolour ombre. By making it yourself, you save a significant amount of money without compromising on quality or appearance. You’re leveraging your own effort and a few basic ingredients to produce a high-end result, which aligns perfectly with a budget-conscious approach to entertaining.
Ingredients You’ll Need
To create this stunning Classy Watercolour Ombre Baby Shower Cake, you’ll need a combination of standard baking ingredients for both the cake and the buttercream. Using quality ingredients will always yield the best results, ensuring your cake is both tender and flavorful. Here’s your essential shopping list, ready for an efficient trip to the grocery store:
For the Cake:
- 2 ½ cups all-purpose flour
- 2 cups granulated sugar
- 1 tablespoon baking powder
- ½ teaspoon salt
- 1 cup (2 sticks) unsalted butter, softened, for cake
- 4 large eggs
- 1 cup whole milk, for cake
- 2 teaspoons vanilla extract, for cake
For the American Buttercream:
- 1 cup (2 sticks) unsalted butter, softened, for buttercream
- 6-8 cups powdered sugar, sifted
- ¼ cup whole milk or heavy cream, for buttercream
- 2 teaspoons vanilla extract, for buttercream
- Pinch of salt, for buttercream
- Gel food coloring (e.g., pastel blue, pink, lavender, or green)
Step-by-Step Instructions
Creating this Classy Watercolour Ombre Baby Shower Cake is a process that’s broken down into distinct, manageable steps. Just like planning out your weekly meals, having a clear sequence of actions will make everything run smoothly. Follow these instructions carefully for a stunning and delicious outcome.
Part 1: Preparing the Cake Layers
- Preheat and Prepare Pans: Begin by preheating your oven to 350°F (175°C). This ensures your oven is at the correct temperature when your batter is ready. Grease and flour two 8-inch round cake pans or, for a taller effect, three 6-inch round pans. Lining the bottoms with parchment paper also helps prevent sticking and makes removal much easier.
- Combine Dry Ingredients: In a large mixing bowl, whisk together the all-purpose flour, granulated sugar, baking powder, and ½ teaspoon of salt. Whisking ensures these ingredients are evenly distributed, which is crucial for a consistent cake texture.
- Cream Butter and Sugar: In a separate, even larger bowl (or the bowl of a stand mixer), cream the 1 cup of softened unsalted butter until it’s light and fluffy. This can take about 2-3 minutes on medium speed. Gradually beat in the granulated sugar until the mixture is pale and airy. This step incorporates air, making your cake tender.
- Add Wet Ingredients: Beat in the eggs one at a time, ensuring each egg is fully incorporated before adding the next. This prevents the batter from curdling. Then, mix in the 1 cup of whole milk and 2 teaspoons of vanilla extract. Scrape down the sides of the bowl as needed to ensure everything is well combined.
- Combine Wet and Dry: Gradually add the dry ingredient mixture to the wet ingredients, mixing on low speed until just combined. It is vital not to overmix the batter at this stage, as overmixing can lead to a tough, dense cake. Stop mixing as soon as no streaks of flour are visible.
- Bake the Cake Layers: Divide the batter evenly among your prepared pans. For precision, you can use a kitchen scale to ensure each pan has the same amount of batter, which helps with even baking and level layers. Bake for 25-30 minutes, or until a wooden skewer or toothpick inserted into the center of a cake layer comes out clean.
- Cool Completely: Let the cakes cool in their pans for about 10 minutes before inverting them onto a wire rack to cool completely. Cooling thoroughly is paramount before frosting; a warm cake will melt your buttercream and ruin your intricate design.
Part 2: Crafting the American Buttercream
- Beat the Butter: In a large bowl or stand mixer fitted with the paddle attachment, beat the 1 cup of softened unsalted butter until it is creamy and smooth, about 2-3 minutes. This aerates the butter, creating a light base for your frosting.
- Gradually Add Powdered Sugar: Gradually add the sifted powdered sugar, alternating with the ¼ cup of whole milk or heavy cream and 2 teaspoons of vanilla extract. Begin on low speed to avoid a cloud of sugar, then increase to medium-high and beat until the buttercream is light, fluffy, and smooth. Add a pinch of salt to balance the sweetness.
- Adjust Consistency: If the buttercream appears too thick, add more milk or cream, one teaspoon at a time, until you reach your desired consistency. If it’s too thin, add more sifted powdered sugar, a quarter cup at a time. The ideal consistency is spreadable but firm enough to hold its shape.
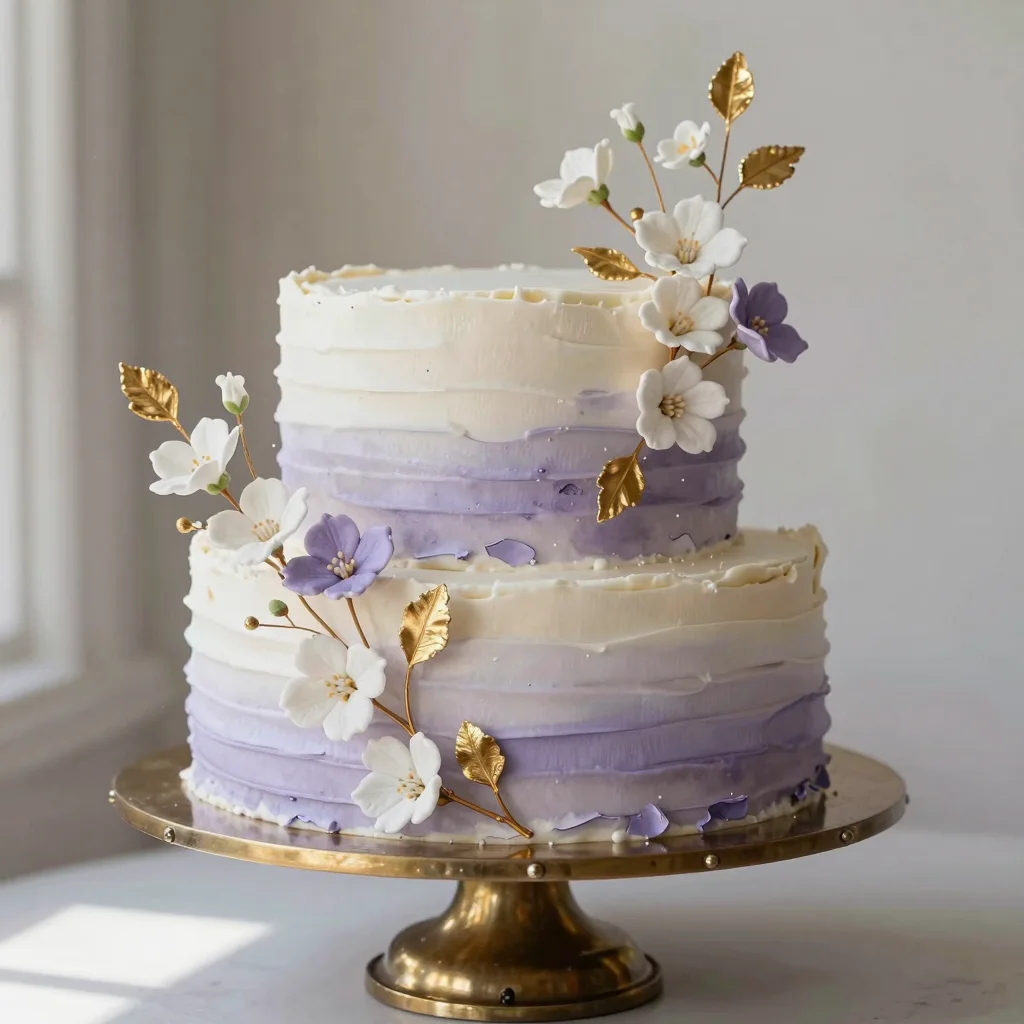
- Divide and Tint Buttercream: This is where the magic begins! Divide the prepared buttercream into 3-4 separate bowls, depending on how many ombre shades you desire. Leave one bowl white. In the remaining bowls, add increasing amounts of your chosen gel food coloring. For instance, if you’re using blue, one bowl gets a tiny dot, the next a slightly larger dot, and the last bowl gets the most coloring. Mix each bowl thoroughly until the color is uniform. Gel food coloring provides vibrant hues without altering the buttercream’s consistency, which is perfect for this precise technique. If you’re looking for other fun cake ideas, you might enjoy exploring fun unicorn cake ideas or even learning how to make a Bluey cake!
Part 3: Assembling and Decorating Your Ombre Masterpiece
- Level Cake Layers (if needed): Using a serrated knife or a cake leveler, carefully trim the tops of your cooled cake layers to create flat surfaces. This ensures a stable and even cake structure.
- Stack and Crumb Coat: Place your first cake layer on a serving plate or cake stand. Spread a thin, even layer of your white or lightest colored buttercream on top. Place the next cake layer and repeat. Once all layers are stacked, apply a very thin, even layer of white buttercream all over the entire cake – this is your crumb coat. Its purpose is to trap any loose crumbs, ensuring a pristine final finish. Chill the cake in the refrigerator for 15-20 minutes to set the crumb coat. This step is essential for a professional look.
- Apply Ombre Bands: Once the crumb coat is firm, retrieve your cake. Starting from the bottom edge of the cake, apply the darkest colored buttercream in a distinct band around the entire base. Above that, apply the next darkest shade, then the lightest shade, and finally, the white buttercream on the very top of the cake and top edge. Ensure that each band slightly overlaps the one below it. Don’t worry about perfection at this stage; we’ll blend soon!
- Achieve the Watercolour Effect: This is the most artistic and rewarding step! Using a clean, warm offset spatula or a bench scraper, gently smooth the buttercream around the cake. Hold the scraper perpendicular to the cake and rotate your cake stand slowly. Lightly drag the scraper through the overlapping bands of color, allowing them to blend subtly. Clean your scraper frequently between passes for the cleanest lines and blend. The goal is a soft, gradual transition between the colors, creating that beautiful watercolour appearance. Take your time, making light, gentle passes until you are satisfied with the blend. For other structured baking projects, a baseball cake recipe guide can also offer great tips for precise decorating. If you prefer something simpler and quick, an easy spring dessert recipe like cupcakes might be more up your alley, or even a simple Irish apple cake for a different flavor profile.
- Final Touches: Once the ombre effect is complete, you can use the remaining white buttercream to pipe a decorative border around the top or bottom edges, or simply leave it smooth for a minimalist aesthetic. Chill the cake for at least 30 minutes before serving to ensure the buttercream is fully set.
Pro Tips for a Flawless Finish
Achieving a bakery-worthy cake at home is absolutely within reach, especially when you incorporate a few professional insights into your process. These tips are all about efficiency and precision, ensuring your Classy Watercolour Ombre Baby Shower Cake turns out exactly as envisioned.
- Temperature is Key for Buttercream: The consistency of your buttercream is paramount for a smooth ombre effect. Ensure your unsalted butter is genuinely softened, not melted, for creaming. When applying the buttercream, if your kitchen is particularly warm, the frosting might become too soft. If this happens, pop it into the refrigerator for 10-15 minutes, then give it a quick whip to restore its ideal texture. A firm, yet spreadable, buttercream makes all the difference for that clean watercolor blend.
- Invest in a Turntable and Bench Scraper: These two tools are game-changers for cake decorating, especially when aiming for smooth sides and precise blending. A rotating cake stand allows you to apply and smooth frosting evenly without constantly moving the cake itself. A sturdy metal bench scraper, held steady against the cake while the turntable spins, is what creates that perfectly straight, polished finish on your ombre bands. This efficient duo makes the process feel incredibly professional and significantly reduces effort.
- The Power of the Crumb Coat: Never skip the crumb coat! This thin layer of buttercream, applied and chilled before your final decorative layers, is your insurance policy against rogue crumbs marring your beautiful ombre design. It seals everything in, providing a clean, smooth canvas for your watercolour masterpiece. It’s a small step that yields a huge return in terms of presentation.
- Practice Makes Perfect (or at least better!): If you’re new to smoothing buttercream, don’t be discouraged if your first attempt isn’t absolutely perfect. The beauty of the watercolour technique is its forgiving nature – slight imperfections can even add to its artistic charm. You can always scrape off a section and reapply. Remember, even experienced bakers continue to refine their techniques. Focus on smooth, consistent pressure and even rotation for the best results.
Variations & Substitutions for Customization
One of the aspects I appreciate most about baking is the ability to customize a recipe to suit specific tastes, dietary needs, or aesthetic preferences. This Classy Watercolour Ombre Baby Shower Cake recipe is a fantastic foundation, but don’t hesitate to make it uniquely yours. Thinking ahead about these variations can be part of your efficient baking plan.
Flavor Enhancements for the Cake:
- Citrus Zest: For a brighter, more vibrant cake, add 1-2 tablespoons of lemon or orange zest to the dry ingredients. This introduces a subtle tang that complements the sweetness of the buttercream beautifully.
- Almond Extract: Substitute half of the vanilla extract with almond extract for a delicate, sophisticated almond flavor. This pairs exceptionally well with pastel colors.
- Spiced Cake: Incorporate ½ teaspoon of ground cinnamon and ¼ teaspoon of nutmeg into the dry ingredients for a subtly spiced cake, perfect for a fall or winter baby shower.
Buttercream Flavor Twists:
- Cream Cheese Buttercream: For a tangier, less sweet frosting, you can make a cream cheese buttercream. Reduce the amount of powdered sugar slightly and add 8 ounces of softened cream cheese to the butter before beating.
- Fruit Puree: Incorporate 2-3 tablespoons of strained fruit puree (like raspberry or strawberry) into one of your colored buttercream bowls for a natural flavor and a slightly different hue. Ensure the puree is very thick to avoid thinning the frosting too much.
- Meringue Buttercream: If you’re feeling adventurous and want a lighter, less sweet frosting, consider swapping the American buttercream for a Swiss or Italian meringue buttercream. While more involved, they offer a silky texture and can be easier to smooth.
Color Palette Customization:
- Gender Reveal: Use a combination of pink and blue gel food coloring for a fun gender reveal effect on the outside, or keep the exterior neutral and have a colored cake layer inside!
- Monochromatic Ombre: Instead of varying shades of one color, try an ombre effect using different shades of white and a very pale pastel, or even just white with a subtle shimmer spray for ultimate elegance.
- Earthy Tones: Experiment with sage green, muted terracotta, or dusty rose for a more bohemian or natural theme, moving from dark to light.
Dietary Considerations:
- Gluten-Free: Substitute the all-purpose flour with a 1:1 gluten-free baking flour blend. Ensure your baking powder is also gluten-free.
- Dairy-Free: Use a plant-based butter substitute (like vegan butter sticks) and a dairy-free milk alternative (such as almond or oat milk) for both the cake and buttercream.
Frequently Asked Questions About Ombre Cakes
When embarking on a baking project, especially one with a specific visual outcome like an ombre cake, questions are bound to arise. I’ve gathered some common inquiries to help you troubleshoot and feel even more confident in your baking endeavors. Thinking through these aspects ahead of time is another way to ensure a stress-free experience.
Can I make this Classy Watercolour Ombre Baby Shower Cake ahead of time?
Absolutely! This recipe is incredibly make-ahead friendly, which is a core principle of efficient baking. You can bake the cake layers up to 2-3 days in advance. Once completely cooled, wrap them tightly in plastic wrap and store them at room temperature, or freeze them for up to a month. For the buttercream, you can prepare it 1-2 days ahead of time and store it in an airtight container in the refrigerator. Before using, let it come to room temperature and then re-whip it on medium speed until it’s light and fluffy again. Assembled and decorated, the cake can be stored in an airtight cake carrier at room temperature for up to 2 days or refrigerated for up to 4 days, though for best presentation, I recommend decorating as close to the event as possible.
What if my buttercream is too soft or too stiff?
Achieving the perfect buttercream consistency is crucial for a smooth ombre effect. If your buttercream is too soft and won’t hold its shape (perhaps due to a warm kitchen or too much liquid), you can try adding more sifted powdered sugar, a quarter cup at a time, and beating until it stiffens. Alternatively, pop the entire bowl of buttercream into the refrigerator for 15-20 minutes, then re-whip it. If your buttercream is too stiff and difficult to spread, add a small amount of whole milk or heavy cream (½ teaspoon at a time) while beating on low speed until it reaches a smooth, spreadable consistency. Always make small adjustments to avoid overcorrecting.
How do I get a truly smooth watercolour ombre effect?
The key to a beautiful, smooth watercolour ombre is patience and proper technique. First, ensure your crumb coat is well-chilled and firm. When applying the colored bands, make sure they slightly overlap. For smoothing, use a clean metal bench scraper held firmly against the cake. Start with light pressure and slowly rotate your cake stand. The trick is to clean your scraper frequently after each pass to remove excess frosting and crumbs. Work in gentle, overlapping passes, gradually increasing pressure if needed, until the colors blend seamlessly. Don’t press too hard, as this can dig into the cake. A warm scraper can also help, so you might quickly dip it in hot water and dry it between passes.
What other occasions can I make this elegant cake for?
While perfect for a baby shower, the Classy Watercolour Ombre Cake design is incredibly versatile and suitable for numerous other special occasions. Consider it for engagement parties, bridal showers, anniversaries, sophisticated birthday gatherings (think a milestone birthday for an adult), or even a refined garden party. By simply adjusting the color palette – perhaps to deeper jewel tones for a winter event or vibrant shades for summer – you can adapt this stunning design to fit any theme or event, making it a truly adaptable centerpiece dessert.
Final Thoughts: Your Masterpiece Awaits
There you have it! A comprehensive guide to creating a Classy Watercolour Ombre Baby Shower Cake that not only looks incredibly sophisticated but is also entirely achievable with a bit of planning and these practical steps. As someone who navigates a busy household and a full-time job, I understand the importance of efficient strategies, and this recipe embodies that approach.
Baking doesn’t have to be a daunting task, even when the desired outcome is something truly exceptional. By breaking down the process, utilizing smart techniques, and focusing on organization, you can transform simple ingredients into a beautiful centerpiece without feeling overwhelmed. Think of this as another successful batch-cooking project, but for dessert!
I encourage you to gather your ingredients, set aside some time, and embark on this rewarding baking adventure. Imagine the admiring glances and appreciative comments when you present this stunning cake. It’s proof that with a clear plan, you can bring elegant creations to life right in your own kitchen, leaving you with more free time for what truly matters. Give this Classy Watercolour Ombre Baby Shower Cake a try; you’ll be so pleased with your efficient and gorgeous results!

Classy Watercolour Ombre Baby Shower Cake
Ingredients
Method
- Preheat oven to 350°F (175°C). Grease and flour two 8-inch round cake pans or three 6-inch round pans. In a large bowl, whisk together flour, granulated sugar, baking powder, and ½ teaspoon salt.
- In a separate large bowl, cream 1 cup softened butter until light and fluffy. Beat in eggs one at a time, then mix in 1 cup whole milk and 2 teaspoons vanilla extract.
- Gradually add the dry ingredients to the wet ingredients, mixing on low speed until just combined. Do not overmix.
- Divide batter evenly among prepared pans. Bake for 25-30 minutes, or until a toothpick inserted into the center comes out clean. Let cool in pans for 10 minutes, then invert onto a wire rack to cool completely.
- For the American Buttercream: In a large bowl, beat 1 cup softened butter until creamy. Gradually add sifted powdered sugar, alternating with ¼ cup milk/cream and 2 teaspoons vanilla extract, beating until light and fluffy. Add a pinch of salt. If too thick, add more milk; if too thin, add more powdered sugar.
- Divide the buttercream into 3-4 bowls. Leave one bowl white. Tint the remaining bowls with increasing amounts of your chosen gel food coloring to create an ombre effect (e.g., very light, medium, darker shade).
- Level cooled cake layers if necessary. Place one cake layer on a serving plate or cake stand. Spread a thin layer of white or lightest colored buttercream on top. Repeat with remaining layers. Apply a thin, even layer of white buttercream all over the cake (crumb coat) to seal in crumbs. Chill for 15-20 minutes.
- Starting from the bottom, apply the darkest colored buttercream in a band around the bottom of the cake. Above that, apply the medium shade, then the lightest shade, and finally the white buttercream on top. Ensure the bands slightly overlap.
- Using a clean, warm offset spatula or bench scraper, gently smooth the buttercream around the cake, rotating it slowly. Lightly drag the spatula through the overlapping colors to blend them, creating a soft, watercolor-like transition. Clean your spatula frequently for the best effect.
- Chill the cake for at least 30 minutes to set the frosting. Decorate with optional sprinkles or a baby shower cake topper if desired. Serve at room temperature.
Notes
Loved this recipe? Save it to your favorite Pinterest board so you can easily find it later! ✨
