Making Special Moments Stress-Free: My Approach to Memorable Baking
As a busy professional and a parent of two energetic kids, I understand the constant juggle. For years, my kitchen felt like a battlefield, especially when it came to special occasions. The thought of baking something elaborate, like a wedding cake, used to send shivers down my spine. The stress of ‘what’s for dinner’ often bled into ‘what am I even going to serve at this event?’, leading to last-minute, expensive, and often less-than-ideal solutions. That’s why I dedicated myself to perfecting a systematic approach to meal planning and special occasion baking – one that maximizes nutrition, minimizes grocery trips, and makes the most of every ingredient, all while keeping a diverse and exciting menu.
My journey taught me that elegance doesn’t have to mean complexity. It’s about smart planning, efficient techniques, and sometimes, embracing a little bit of creative ingenuity. Over the past decade, I’ve transformed my family’s eating habits and, more importantly, my own peace of mind. Today, I’m thrilled to share a method that embodies this philosophy: creating beautiful, personalized candy-covered wedding cakes without the professional bakery price tag or the overwhelming stress. This isn’t just a recipe; it’s a testament to achievable success and confidence in your own kitchen, even for the most significant events. Let’s make something beautiful and manageable together!
Whether you’re a DIY bride, helping out a friend, or simply looking for a unique and budget-conscious way to add a personal touch to a smaller gathering, these candy-covered mini wedding cakes are a game-changer. They offer a fantastic blend of elegance and playful charm, proving that you don’t need years of pastry school to create something truly extraordinary. It’s all about breaking down the process into clear, actionable steps, and that’s precisely what we’re going to do.
Table of Contents
- Making Special Moments Stress-Free: My Approach to Memorable Baking
- Why This Recipe Works for You
- Essential Ingredients You’ll Need
- Step-by-Step: Crafting Your Candy Covered Cakes
- Olivia’s Expert Pro Tips for Perfection
- Creative Variations & Smart Substitutions
- Frequently Asked Questions (FAQ)
- Embracing the Sweet Simplicity
Why This Recipe Works for You
This recipe for candy covered wedding cakes isn’t just about making a pretty dessert; it’s about smart planning and achieving impressive results with minimal fuss. Here’s why this approach will become your new favorite for special occasions:
- Uncomplicated Elegance: You don’t need advanced baking skills or intricate piping techniques to achieve a sophisticated look. The beauty of these cakes lies in their simplicity and the vibrant impact of the candy decorations. It’s a method that allows anyone to create something visually striking without the usual stress associated with wedding cake preparation. This helps in achieving that coveted ‘DIY wedding cake’ aesthetic without the steep learning curve.
- Budget-Friendly Genius: Professional wedding cakes can be incredibly expensive. By opting for mini cakes and decorating them yourself, you significantly reduce costs without compromising on presentation. Using pre-made sponge cakes and store-bought frosting further slashes expenses and prep time, making ‘candy wedding cakes’ an accessible option for everyone. Think of the savings you can reallocate to other aspects of your special day, or perhaps invest in more premium ingredients for the main meal!
- Customizable to Your Vision: From the choice of candies to the colors of frosting and glitter, every element can be tailored to match your wedding theme or personal aesthetic. This recipe provides a flexible canvas for your creativity, ensuring your ‘wedding cake recipe’ is as unique as your event. Whether you prefer subtle pastels, bold metallics, or a playful mix of shapes and textures, the possibilities for ‘candy decoration’ are virtually endless, allowing for truly ‘unique wedding cake’ designs.
In essence, this recipe empowers you to take control of your kitchen and create something truly memorable, all while keeping your budget and peace of mind intact. It’s about making ‘easy wedding cake’ a reality, not just a dream.
Essential Ingredients You’ll Need
Gathering your ingredients is the first step towards a smooth baking process. Here’s a precise list to ensure you have everything on hand. Remember, preparation is key to a stress-free experience!
- 12 mini sponge cakes: You can either purchase these pre-made from your local bakery or grocery store (look for plain mini cupcakes or small round sponges), or bake them from scratch if you prefer. Ensuring they are completely cooled before frosting is paramount for a neat finish. If you’re baking your own, consider a reliable recipe for an easy vanilla cherry cake or even a rich decadent chocolate cake base for variety.
- 1 tub (16 oz) white vanilla frosting: Store-bought vanilla frosting works wonderfully for this project. Its smooth consistency is ideal for coating and adhering candies. If you prefer, you can make your own buttercream, but ensure it’s a consistency that’s easy to spread and will hold the candies well.
- 1/2 cup assorted small candies: This is where the fun truly begins! Think sprinkles (jimmies, nonpareils), edible pearls (silver, gold, iridescent), mini heart candies, small sugar flowers, or even finely crushed hard candies. Choose candies that complement your desired aesthetic and color palette.
- Optional: Edible glitter: For that extra sparkle and a touch of glamour, edible glitter can elevate the appearance of your cakes. Available in various colors, a light dusting can make a significant visual impact.
Having all these components ready before you begin decorating will streamline the process and allow you to focus on the artistic application. This organized approach is a cornerstone of my kitchen philosophy, ensuring every project, big or small, runs as efficiently as possible.
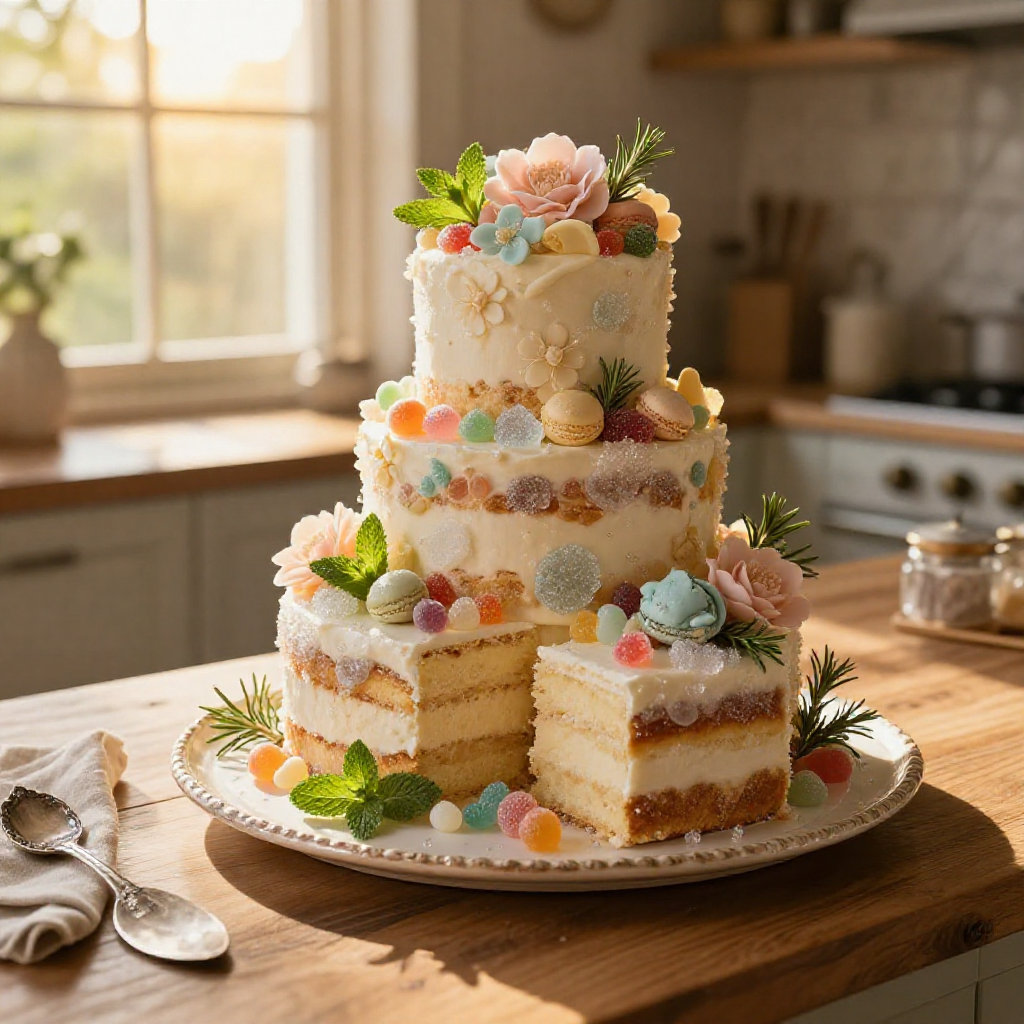
Step-by-Step: Crafting Your Candy Covered Cakes
Now that you have all your ingredients ready, let’s dive into the practical steps of transforming simple mini cakes into stunning, personalized wedding treats. Precision and a steady hand will yield the best results, but don’t be afraid to experiment and enjoy the process!
- Prepare Your Cakes: If you’ve baked your mini sponge cakes from scratch, ensure they are absolutely and completely cooled before you even think about frosting them. Warm cakes will cause your frosting to melt and slide off, creating a messy situation. If using pre-made cakes, take them out of their packaging and arrange them on a clean, flat surface or a wire rack set over parchment paper. Having them accessible and ready is crucial for an efficient workflow.
- Frost with Precision: Open your tub of white vanilla frosting. Using an offset spatula or a flat knife, generously apply a layer of frosting to each mini cake. The goal here is a smooth, even coating all around the cake – tops and sides. Don’t be shy with the frosting; a good, thick layer will not only taste delicious but also provide an ideal sticky surface for your candies. Work quickly but carefully to maintain an even spread.
- Apply the Candies (The Fun Part!): This step needs to be done while the frosting is still fresh and tacky. You have a few options for application, depending on the effect you desire and the type of candies you’re using:
- Rolling Method: For an all-over candy coating, pour your assorted small candies into a shallow bowl or plate. Gently pick up a frosted mini cake by its base and carefully roll the sides of the cake through the candies. The frosting will pick up the decorations, creating a seamless, sparkling edge.
- Pressing Method: If you’re using larger candies, or want more control over placement, you can gently press individual candies onto the frosted top and sides with your fingers. This method is excellent for creating specific patterns or focal points.
- Tweezers for Intricacy: For very small, delicate candies or intricate designs (like spelling out initials or creating a specific motif), a pair of clean, food-safe tweezers can be your best friend. This allows for precise placement and a truly professional finish, perfect for a detailed ‘candy decoration’.
Ensure you cover as much of the frosted surface as you desire, creating a visually appealing density of candies.
- Add Edible Glitter (Optional): If you’ve chosen to use edible glitter, now is the time to apply it. Hold the cake over a piece of parchment paper to catch any excess. Lightly dust the top and sides of the cake with glitter. You can use a small, clean brush for a more controlled application or simply sprinkle it gently from your fingertips. This adds a beautiful shimmer that catches the light, making your ‘sweet wedding treats’ truly stand out.
- Arrange and Set: Once decorated, carefully transfer each candy-covered mini cake to a serving platter, individual cupcake liners, or a presentation stand. Give the frosting about 30 minutes at room temperature to set slightly, or if your kitchen is particularly warm, you can briefly chill them in the refrigerator for 10-15 minutes. This setting time ensures the frosting firms up and the candies adhere securely, preventing any mishaps when serving.
And there you have it! A collection of stunning, personalized mini wedding cakes, ready to impress your guests. This systematic approach ensures that even complex-looking desserts are entirely within your grasp, reinforcing the idea that ‘easy wedding cake’ is not just a myth.
Olivia’s Expert Pro Tips for Perfection
Achieving a professional-looking finish with your candy-covered wedding cakes is entirely within reach, even for the novice baker. Over the years, I’ve gathered some indispensable tips that make all the difference, transforming a good result into a truly spectacular one. These are the little secrets that bring calm to the kitchen and consistently deliver outstanding outcomes.
- Temperature Control for Frosting: The consistency of your frosting is critical. If it’s too cold, it will be stiff and difficult to spread smoothly. If it’s too warm, it will be runny and won’t hold the candies effectively. Aim for room temperature, or slightly cooler if your kitchen is warm. If using store-bought frosting, give it a good stir with a spoon or spatula before use to ensure it’s uniform and pliable. This attention to detail will ensure your ‘candy wedding cakes’ have a flawless foundation.
- The Art of Even Coating: When applying frosting, use a generous amount and strive for an even layer. An offset spatula is your best tool for this, allowing you to glide the frosting across the cake surface with minimal effort. The smoother and more uniform your frosting layer, the better your candies will adhere, and the more polished your final product will appear. Think of it as creating a perfect canvas for your ‘candy decoration’.
- Strategic Candy Selection: Don’t just grab any candies! Consider the overall aesthetic. Mix different sizes and textures for visual interest – tiny nonpareils, larger edible pearls, and perhaps some shaped sugar candies. If your event has specific colors, choose candies that match or complement the palette. Having a variety allows for more dynamic and ‘unique wedding cake’ designs. Also, ensure the candies are fresh and not sticky, as this can affect their adherence.
- Work Smart, Not Hard: Set up an assembly line for efficiency. Have your cooled cakes ready, then your frosting station, followed by your candy bowls. Frost all the cakes first, and then immediately move to decorating them with candies. The frosting needs to be wet and tacky for the candies to stick, so working in batches or having a helper can be very beneficial. This organized approach minimizes wasted time and ensures consistent results across all your mini cakes. For larger projects, understanding concepts like a cake pricing guide might not be directly applicable, but the principles of efficient production certainly are!
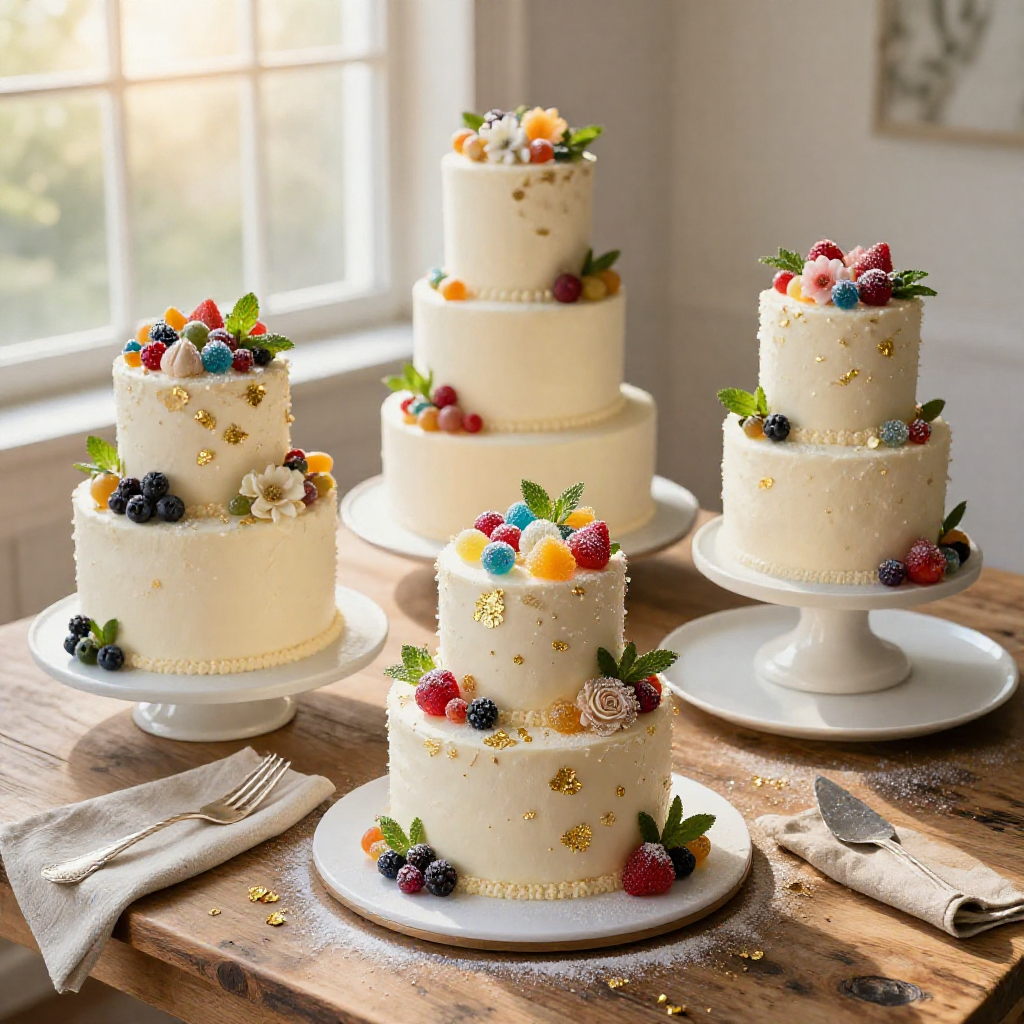
- Presentation Matters: How you display these beautiful creations is almost as important as making them. Arrange them on a multi-tiered stand for a classic wedding cake look, or place them individually in elegant cupcake liners or small boxes for guest favors. Consider adding fresh flowers (non-toxic and food-safe, of course) or greenery around the base of your display for an extra touch of sophistication. A well-presented dessert elevates the entire experience.
Creative Variations & Smart Substitutions
The beauty of this candy-covered wedding cake recipe lies not only in its simplicity but also in its incredible adaptability. While the basic technique remains the same, you can easily customize these mini cakes to suit any theme, dietary need, or personal taste. This section explores various ways to put your unique stamp on these ‘sweet wedding treats’, ensuring they truly reflect your vision.
Cake Base Variations
- Flavor Profiles: Don’t limit yourself to vanilla! Use mini sponge cakes in chocolate, lemon, red velvet, or almond. A rich decadent chocolate cake base can be stunning with gold candies, while a delicate lemon cake pairs wonderfully with pastel sprinkles. Baking your own mini cakes allows for endless flavor exploration.
- Dietary Adaptations: For guests with specific dietary requirements, source gluten-free or vegan mini sponge cakes. Most major grocery stores now offer excellent pre-made options that can be easily frosted and decorated just like their traditional counterparts. This ensures everyone can partake in the ‘unique wedding cake’ experience.
Frosting & Topping Alternatives
- Colored Frosting: Instead of white vanilla frosting, tint it with food coloring to match your wedding colors. Pastel pink, sky blue, or mint green frosting can create a striking backdrop for contrasting or complementary candies. Remember to use gel food coloring for vibrant hues without thinning the frosting too much.
- Cream Cheese or Buttercream: If you prefer a homemade touch, a classic cream cheese frosting or a smooth American buttercream can be used. Just ensure the consistency is thick enough to hold the candies firmly. If making your own, a recipe for an elegant rose petal cake might provide a great buttercream base.
- Chocolate Drizzle: After applying the candies and allowing them to set, you could add a delicate drizzle of melted white or dark chocolate over the top for an extra layer of flavor and visual appeal.
Candy & Decoration Creativity
- Themed Candies: For a specific theme, look for candies that align. Think edible pearls for a sophisticated look, metallic sprinkles for glamour, or even small sugar flowers for a garden theme. Customized M&Ms or small candy initials can add a very personal touch to your ‘candy decoration’.
- Dried Fruit & Nuts: For a more rustic or natural aesthetic, finely chopped dried cranberries, pistachios, or candied ginger can be pressed into the frosting instead of traditional candies. This offers a more sophisticated textural contrast.
- Coconut Flakes: Toasted coconut flakes can provide a wonderful textural element and a tropical twist, especially if paired with a lemon or pineapple flavored cake.
- Fondant Accents: While the core idea is simplicity, small, pre-cut fondant shapes (like tiny hearts or stars) can be pressed onto the frosting for a more defined look, without needing extensive fondant skills.
By exploring these variations and substitutions, you can truly make this ‘wedding cake recipe’ your own, crafting a dessert that is not only visually stunning but also perfectly tailored to your event and guests. This flexible approach is what makes DIY baking so rewarding and manageable.
Frequently Asked Questions (FAQ)
Can I make these candy covered wedding cakes ahead of time?
Absolutely! These mini cakes are quite forgiving when prepared in advance. You can bake the mini sponge cakes up to 2-3 days prior and store them in an airtight container at room temperature, or freeze them for up to a month (thaw overnight in the refrigerator). Once frosted and decorated with candies, they can be stored in an airtight container at room temperature for 1-2 days. For longer storage or if your frosting contains perishable ingredients, refrigerate them for up to 3-4 days. Allow them to come to room temperature for about 30 minutes before serving for optimal texture and flavor.
What if my candies aren’t sticking to the frosting?
This usually indicates that your frosting has set too much, or its consistency isn’t quite right. Ensure you apply the candies immediately after frosting each cake while the frosting is still wet and tacky. If your frosting is too stiff, try warming it slightly (you can microwave store-bought frosting for 5-10 seconds, stirring well) to make it more pliable. If it’s too runny, chill it for a bit to firm it up. For stubborn candies, a light spray of edible adhesive (available at baking supply stores) can help, but generally, a fresh, properly consistent frosting should be sufficient.
Can I use larger cakes or different shapes for this recipe?
Yes, you certainly can! The technique of frosting and applying candies works equally well on larger cakes, individual cupcakes, or even different shapes like squares or hearts. Simply adjust the quantity of frosting and candies you purchase based on the size and number of cakes you plan to decorate. For a multi-tiered look, you could use several different sized round cakes, frost and candy-coat them, and then carefully stack them using dowels for support. This flexible approach allows you to create an elegant birthday cake or any other special occasion treat with a similar ‘candy decoration’ theme.
How do I transport these delicate candy-covered cakes without damage?
Transporting decorated cakes requires careful planning. For individual mini cakes, place them in cupcake carriers with individual compartments or line a sturdy box with non-slip mats. Ensure there’s enough space between cakes so they don’t bump into each other. If stacking in a box, use parchment paper between layers. For larger cakes or tiered designs, invest in a proper cake box that is slightly larger than your cake’s base. Drive slowly and avoid sudden stops or turns. Keeping the car cool (air conditioning on) during transport is also crucial, especially on warmer days, to prevent the frosting from melting and the candies from sliding.
Embracing the Sweet Simplicity
Creating these candy-covered wedding cakes is more than just following a recipe; it’s about embracing the possibility of crafting something beautiful and personal without succumbing to overwhelming pressure. My journey in the kitchen has always been about finding practical solutions that bring a sense of accomplishment and calm, transforming what once felt like daunting tasks into manageable, rewarding projects. This recipe truly embodies that philosophy, offering a clear path to an impressive outcome.
You now have the tools and the knowledge to create stunning, ‘unique wedding cake’ alternatives that will undoubtedly impress your guests. Whether you’re a seasoned baker or just starting your DIY adventures, the process is designed to be straightforward, allowing your creativity to shine without unnecessary complications. The satisfaction of presenting something you’ve made with your own hands, especially for such a significant event, is unparalleled. It’s a testament to your resourcefulness and your ability to bring your vision to life, one perfectly decorated mini cake at a time.
So, gather your ingredients, set aside some focused time, and dive into this rewarding project. Don’t be afraid to experiment with different candies and colors to make these cakes truly your own. I encourage you to try this recipe and discover how simple and satisfying it can be to create something truly special. Your kitchen is a place of endless possibilities, and with a little organization and these actionable steps, you’ll be amazed at what you can achieve. Happy decorating!
Candy Covered Wedding Cakes
Ingredients
Method
- Ensure mini sponge cakes are completely cooled.
- Generously frost each mini cake with white vanilla frosting.
- While frosting is wet, roll cake sides in candies or press candies onto top and sides.
- Optionally, use tweezers for intricate candy placement.
- If desired, sprinkle with edible glitter for sparkle.
- Place decorated cakes on a platter or in individual cupcake liners.
- Allow frosting to set for 30 minutes at room temperature or chill briefly before serving.
Notes
Loved this recipe? Save it to your favorite Pinterest board so you can easily find it later! ✨