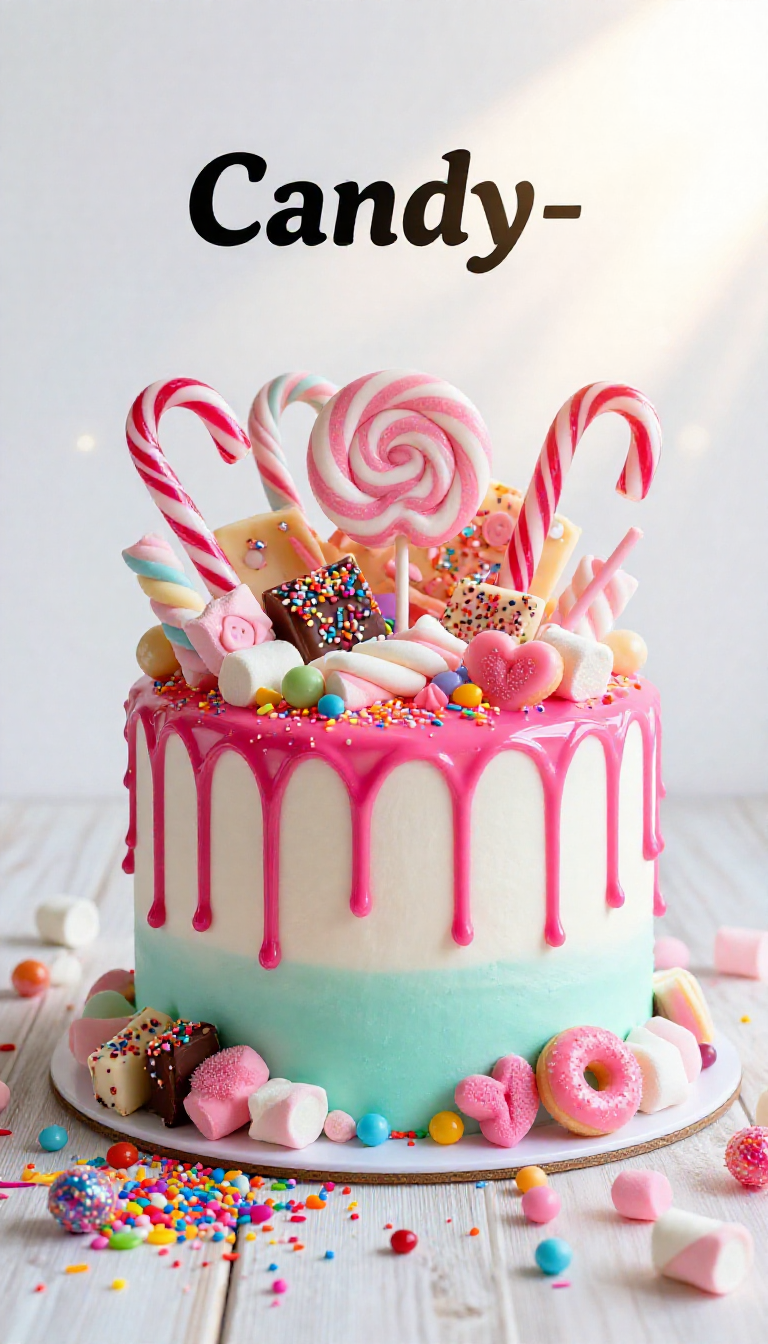
19 Epic Candy-Covered Wedding Cakes
Crafting Culinary Masterpieces: My Journey to Wholesome, Inventive Meal Planning
As many of you know, my culinary path began not with grand ambitions, but with a simple desire to nourish myself and my loved ones more effectively. I remember feeling a bit overwhelmed by the sheer volume of health goals and the aspiration to cook more adventurously, yet struggling to find the time or inspiration. It was in that moment of delightful chaos that I discovered the transformative power of meal planning. What started as a personal challenge – finding structure amidst a whirlwind of diverse recipes and nutritional objectives – soon blossomed into a true expertise. I learned how to expertly balance vibrant flavor, essential nutrition, and a relaxed ease that made cooking a source of anticipation, not apprehension.
This philosophy of thoughtful preparation, of turning a task into an art form, extends far beyond weekly dinners. It’s about viewing every culinary endeavor as an opportunity for creative expression and personal flourishing. Meal planning, for me, isn’t merely about organizing ingredients; it’s about unlocking new flavor combinations, exploring global cuisines from my kitchen, and adapting to various dietary needs without ever compromising on ingenuity. It’s about making healthy eating an exciting, sustainable lifestyle, where every dish is a step towards a well-nourished existence.
And what could be a more spectacular testament to this inventive approach than a wedding cake that defies convention? Forget the traditional. Today, we’re diving into the wonderfully whimsical world of candy-covered wedding cakes – a concept that perfectly marries the artistry of baking with the spontaneous spirit of confectionary exploration. These aren’t just desserts; they are edible sculptures, bursts of personality, and absolute showstoppers that promise to make any special occasion truly unforgettable. Get ready to transform your perception of wedding desserts and embark on a sweet, structural adventure!
Table of Contents
- Why This Dazzling Creation Works
- The Candy Canvas: Ingredients You’ll Need
- Building Your Edible Dream: Step-by-Step Instructions
- Nora’s Expert Insights for a Flawless Finish
- Expanding Your Palate: Variations & Substitutions
- Frequently Asked Questions About Candy Cakes
- Your Culinary Adventure Awaits!
Why This Dazzling Creation Works
The allure of a candy-covered wedding cake lies in its undeniable ability to capture attention and spark conversation. In a world of increasingly personalized events, couples are seeking ways to infuse every element with their unique narrative. This type of cake stands out as a vibrant, playful, and utterly personal centerpiece, moving beyond conventional elegance to embrace a spirit of fun and individuality. It’s a bold statement that tells guests, ‘This occasion is truly special, and we’re here to celebrate with zest!’
Beyond its striking appearance, a candy-covered cake offers an unparalleled opportunity for customization. The sheer variety of candies available means that every cake can be a bespoke creation, reflecting specific color schemes, thematic elements, or even the couple’s favorite childhood treats. Whether you envision a cascade of shimmering rock candy, a playful scattering of jelly beans, or an architectural arrangement of chocolate bars, the possibilities are virtually limitless. This level of personalization transforms the dessert from a mere course into a powerful symbol of the couple’s distinct tastes and shared journey.
Furthermore, this approach to cake decorating, while appearing complex, is surprisingly accessible. Many of the techniques involve straightforward application and arrangement, making it an achievable project for enthusiastic home bakers. With a sturdy cake base and a vision, you can create a masterpiece that looks professionally crafted without needing years of patisserie training. It’s about embracing creativity, enjoying the process, and allowing the vibrant textures and colors of the candies to do most of the spectacular work, resulting in an epic cake that delights all who behold it.
The Candy Canvas: Ingredients You’ll Need
Creating your candy-covered masterpiece begins with selecting both your cake’s foundational elements and your dazzling array of confections. The beauty of this concept is in the endless combinations, allowing you to tailor your creation precisely to your vision. Here’s a comprehensive list to get your planning started:
For the Cake Base and Frosting:
- All-purpose flour
- Granulated sugar
- Eggs (large)
- Unsalted butter (softened)
- Baking powder
- Vanilla extract (pure)
- Milk (whole or preferred alternative)
- Salt (a pinch enhances flavor)
- Powdered sugar (for frosting)
- Cream cheese (optional, for cream cheese buttercream)
For the Candy Covering:
- Jelly beans (assorted colors or specific hues)
- Rock candy (on sticks or loose crystals, clear or colored)
- Space fizzers (for a whimsical, effervescent touch)
- Liquorice (various forms: ropes, twists, wheels)
- Marshmallows (mini or jumbo, toasted or plain)
- Chocolate bars (chopped, whole, or melted for drizzles)
- Clear rock candy (for an icy, elegant look)
- Braided metallic liquorice (for intricate detailing)
- Pink mints (for subtle color and refreshing taste)
- Doughnuts (mini or full-sized, for unique tiers or toppers)
- Macarons (assorted flavors and colors for French patisserie elegance)
- Chocolate covered pretzels (for a salty-sweet crunch and structure)
- Pocky sticks (for delicate, edible architectural elements)
- Lollipops (swirls, clear, or gourmet varieties)
- Gum balls (colorful spheres for a playful effect)
- White chocolate bark (broken into shards for texture and height)
- A cupcake (as a whimsical topper or side adornment)
- Jellies (gummy candies, fruit-flavored for translucence)
- Sweeties (a general term for various small, colorful candies)
- A mini cone (for a playful, ice cream-inspired touch)

Building Your Edible Dream: Step-by-Step Instructions
Crafting a candy-covered wedding cake is a multi-step process that combines baking expertise with artistic flair. Each stage is an opportunity to contribute to the final, spectacular outcome. Follow these steps to construct your edible masterpiece:
- Choose and Prepare Your Cake Base: Begin by selecting your desired cake flavor(s) – classic vanilla, rich chocolate, or perhaps a vibrant lemon cake. Bake your cake layers according to your chosen recipe, ensuring they are perfectly baked and cooled completely. For a tiered cake, you will need multiple sizes. Level each cooled cake layer using a serrated knife or a cake leveler, creating flat surfaces for stable stacking. This foundation is crucial for the structural integrity of your impressive dessert.
- Craft Your Frosting: Prepare a generous batch of your chosen frosting. A sturdy buttercream (American, Swiss meringue, or Italian meringue) is generally preferred for its ability to hold up under the weight of candies and provide a smooth canvas. Ensure your frosting is at the right consistency – spreadable but not too soft – to achieve crisp edges and a firm hold for your decorations.
- Crumb Coat and Final Coat the Cakes: Apply a thin layer of frosting, known as a ‘crumb coat,’ to each cake layer. This traps any loose crumbs, ensuring a pristine finish. Chill the crumb-coated cakes in the refrigerator for 15-20 minutes until the frosting is firm. Once chilled, apply a thicker, even layer of frosting as your final coat, aiming for smooth sides and a level top. This will be the adhesive for your candies.
- Assemble Your Tiers (If Applicable): For multi-tiered cakes, proper assembly is vital. Insert food-safe dowels or support straws into the lower tiers to bear the weight of the tiers above. Carefully stack your frosted cakes, centering each tier. This structural support prevents sagging and ensures your cake remains upright and elegant throughout the event.
- Begin the Candy Application: This is where the magic truly unfolds! Start by conceptualizing your design. Will it be a cascading waterfall of color, a geometric pattern, or a playful scattering? Begin applying your chosen candies. For larger items like chocolate bars or Doughnuts, you might want to secure them with a dab of extra frosting. Lollipops and Pocky sticks can be gently inserted directly into the cake. Smaller candies like jelly beans and gum balls can be pressed directly into the frosted surface. Think about creating textural contrast by mixing smooth jellies with crunchy chocolate-covered pretzels, and visual interest by combining vibrant space fizzers with elegant clear rock candy.
- Focus on Color and Texture: Pay close attention to your color scheme. You can opt for a monochromatic look with various shades of pink mints and red jellies, or a vibrant rainbow explosion. Alternate textures – the chewiness of liquorice against the crispness of white chocolate bark – to keep the eye moving and the palate intrigued. Don’t be afraid to experiment with placement, perhaps creating a bold stripe of braided metallic liquorice or a whimsical cloud of marshmallows.
- Add Finishing Touches and Architectural Elements: Elevate your design with unique toppers and structural accents. A strategically placed cupcake, a delicate mini cone, or a cluster of macarons can add height and unexpected charm. Consider using rock candy sticks or Pocky to create miniature edible fences or frameworks around certain sections. Stand back frequently to assess your progress and make adjustments, ensuring a balanced and visually striking presentation for your unique wedding cakes.
Nora’s Expert Insights for a Flawless Finish
Creating a candy-covered wedding cake is an exhilarating project, and with a few seasoned insights, you can ensure your creation is not only stunning but also structurally sound and utterly delicious. These tips come from my experience in crafting well-planned, inventive meals and desserts, focusing on precision and creative execution.
Firstly, **Foundation First: Prioritize a Sturdy Base.** The magnificence of your candy adornments depends entirely on the stability of your cake. Use a dense, sturdy cake recipe that can withstand the weight of numerous candies without collapsing. Chocolate or vanilla sponge cakes are excellent choices, while lighter sponges might need additional support. Ensure your frosting is also robust; a well-made buttercream provides the necessary adhesive power for all those delightful confections. A stable cake board and proper doweling for multi-tiered structures are non-negotiable for a successful, upright display.
Secondly, **Embrace Color and Texture Play.** The true artistry of a candy cake lies in its visual dynamism. Don’t just haphazardly place candies; think about how colors interact and how different textures contribute to the overall aesthetic. Group similar colors for impactful blocks, or scatter contrasting hues for a vibrant, confetti-like effect. Mix the smooth surfaces of gum balls and jellies with the jagged edges of broken white chocolate bark or the intricate braids of liquorice. Creating these varied visual and tactile experiences will make your candy-covered cake truly epic, a topic of admiration and conversation.
Thirdly, **The Art of Knowing When to Stop.** While the temptation to add ‘just one more candy’ can be strong, sometimes less is indeed more. A cluttered cake can lose its visual impact and appear overwhelming. Step back frequently as you decorate to assess the balance and overall composition. Aim for a harmonious design where each candy feels intentionally placed. It’s about creating an abundance that feels curated, not chaotic. This careful consideration ensures an elegant, sophisticated execution, even with a multitude of sweeties.
Finally, **Mastering Storage and Presentation.** Once your masterpiece is complete, proper storage is key to maintaining its integrity and freshness. Store your candy cake in a cool, dry place, ideally in a large cake box or covered container. Avoid direct sunlight or excessive humidity, which can melt certain candies or cause them to become sticky. If your cake contains perishable elements like fresh fruit (though less common in pure candy cakes), refrigerate and bring to room temperature only shortly before serving. For transport, ensure the cake is securely placed on a flat, stable surface in your vehicle to prevent any shifts or damage to your meticulously arranged candy architecture.
Expanding Your Palate: Variations & Substitutions
The beauty of the candy-covered wedding cake concept is its incredible adaptability. It’s an invitation to experiment, allowing you to truly personalize your creation beyond the suggested ingredients. My approach to meal planning always involves seeking fresh perspectives and inventive solutions, and this applies perfectly to designing unique wedding cakes.
Consider the **Flavor Profiles** of your cake base. While vanilla and chocolate are timeless, imagine the vibrant contrast of a lemon cake base underpinning a bright, fruity candy assortment, perhaps incorporating mini lemon cakes for individual servings. Or, for a more robust and sophisticated foundation, a rich chocolate Guinness cake could provide an unexpected depth that balances the playful sweetness of the candies. You could even explore a slightly tangy cream cheese frosting to complement certain candies, contrasting beautifully with the sweetness. While not a direct substitute, understanding the components of a cheesecake batter gives you an idea of how different textures and flavors can be engineered in a dessert, inspiring you to think broadly about your cake’s internal structure and taste.
Beyond the base, delve into **Candy Themes**. Instead of a general assortment, you could theme your candy selection. A ‘retro candy’ cake might feature classic liquorice, gum balls, and space fizzers, evoking nostalgia. A ‘gourmet candy’ cake could lean into artisanal chocolate bars, high-quality macarons, and sophisticated rock candy. For a striking visual, consider a monochromatic theme, using various shades of pink mints, red jellies, and strawberry-flavored marshmallows. This focused approach can create a stunning and cohesive aesthetic that rivals the intricate designs of beautiful blooming cakes.
For **Dietary Adaptations**, the modern kitchen offers numerous solutions. If you need a gluten-free option, many excellent gluten-free cake mixes and recipes are available that hold up beautifully. Similarly, dairy-free buttercreams and plant-based milks can be used to accommodate dairy restrictions. Seek out candies made with alternative sweeteners for those monitoring sugar intake, or explore natural fruit leathers and dried fruit for a healthier ‘candy’ aesthetic. The key is to source ingredients carefully and ensure they align with your guests’ needs without sacrificing the visual spectacle or the delightful taste of your dessert recipes.
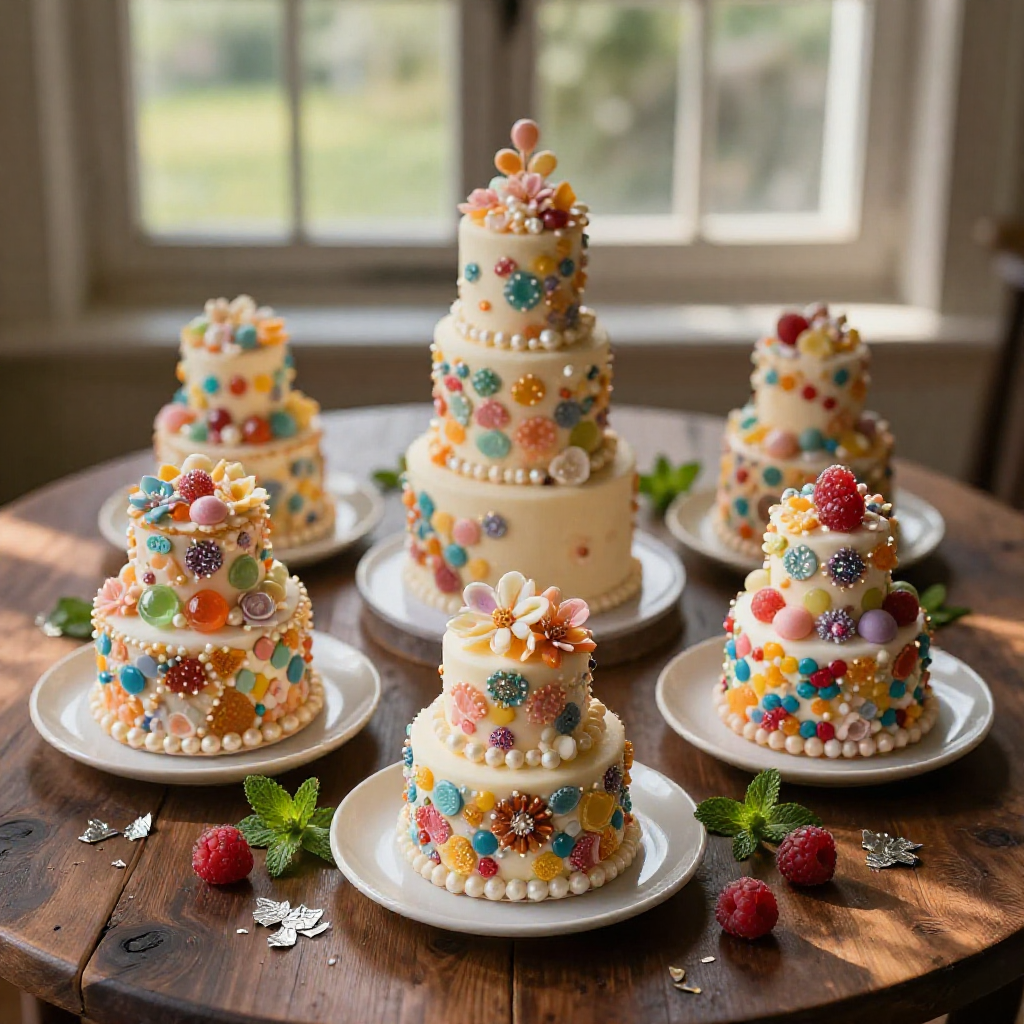
Finally, consider **Beyond the Traditional Cake Structure**. While a multi-tiered candy cake is undoubtedly epic, you can apply these decorating principles to smaller formats. Imagine a dessert table featuring individual candy-covered cupcakes, a vibrant candy-decorated doughnut wall, or even an assortment of mini cakes adorned with specific candies. This allows for diverse flavor offerings and caters to different portion preferences, making your wedding dessert ideas even more versatile and inclusive. The same creative energy you put into a grand wedding cake can be channeled into these smaller, equally charming confections.
Frequently Asked Questions About Candy Cakes
How far in advance can I make a candy-covered cake?
For optimal freshness and appearance, it’s generally best to bake and frost the cake layers 1-2 days before the event. The candy application itself should ideally happen within 24 hours of the event. This prevents candies from potentially melting, becoming sticky, or losing their vibrant color due to humidity or prolonged exposure to air. Some sturdy candies like rock candy or chocolate bars will hold up longer, but softer items like marshmallows or jellies are best applied closer to serving time.
What’s the best way to transport a tiered candy cake?
Transporting a tiered candy cake requires careful planning. For maximum security, it’s often best to transport the tiers separately, especially if they are large, and assemble them at the venue. If transporting fully assembled, use a sturdy, non-slip cake board larger than the bottom tier and secure it within a robust cake box. Place non-slip mats or towels in your vehicle (on a flat surface like the floor or trunk) to prevent movement. Drive slowly and avoid sudden stops or turns. Ensure the car interior is cool to prevent any candy melting.
Can I use fresh fruit alongside candy on my wedding cake?
While fresh fruit can add a refreshing element, it requires careful consideration on a candy-covered cake. Fruits release moisture, which can affect the stability of certain candies or cause them to become sticky. If you wish to incorporate fruit, consider adding it as close to serving time as possible, or use fruits that are less prone to weeping, like berries. Alternatively, feature fruit on a separate dessert platter to maintain the integrity of your candy design.
How do I prevent candies from melting or falling off?
To prevent melting, store your cake in a cool, dry environment, away from direct sunlight or heat sources. A sturdy buttercream frosting is crucial for adhesion; ensure it’s firm enough to hold the candies. For heavier candies or those prone to slipping, a small dab of royal icing or melted chocolate can provide extra grip. For candies that might absorb moisture and become sticky (like some jellies or gum balls), you can brush them with a thin layer of edible lacquer or confectioner’s glaze, or simply apply them just a few hours before the event.
Your Culinary Adventure Awaits!
Stepping into the realm of candy-covered wedding cakes is an exhilarating journey, a true testament to the power of imagination in the kitchen. It’s about more than just baking; it’s about crafting an experience, a memory that will sparkle and linger long after the last piece is savored. These epic cakes are not just desserts; they are vibrant declarations of individuality, playful expressions of style, and a brilliant way to make any significant occasion truly your own.
I find immense satisfaction in guiding individuals to master the art of planned deliciousness, and this concept fits perfectly within that philosophy. It encourages experimentation, invites you to play with colors and textures, and ultimately transforms meal prep, or in this case, cake prep, into an enjoyable and anticipatory event. From the selection of your favorite sweeties to the intricate placement of each piece of rock candy, every step is an opportunity for creative exploration.
So, are you ready to embark on this fantastic culinary adventure? Are you prepared to design a show-stopping dessert that will leave your guests utterly amazed? Gather your ingredients, unleash your inner artist, and create a candy-covered wedding cake that is as unique and memorable as the occasion itself. Let your imagination be your guide, and watch as your vision transforms into an edible masterpiece. I cannot wait to hear about your incredible creations!
Epic Candy-Covered Wedding Cake
Ingredients
Method
- Prepare your multi-tiered cake with desired frosting, ensuring a smooth and stable base for decorations.
- Apply a rainbow drip if desired, allowing it to set slightly before adding solid decorations.
- Arrange larger candies like doughnuts, macarons, and oversized lollipops as focal points on each tier.
- Fill in gaps with smaller candies such as jelly beans, M&Ms, Skittles, and crushed rock candy, creating a vibrant mosaic.
- Add decorative elements like chocolate shards, edible flower bark, and candy canes for texture and visual interest.
- Finish with a generous sprinkle of sprinkles and any remaining delicate candies or bows for a final flourish.
Notes
Loved this recipe? Save it to your favorite Pinterest board so you can easily find it later! ✨