Welcome, fellow artisans of the kitchen, to another exploration of enduring flavor! Today, we’re diving into a classic comfort food with a twist: the Tuna Melt Wrap. This isn’t just another quick lunch; it’s an exercise in transforming simple ingredients into a symphony of taste and texture. At The Artisan’s Ledger, we believe that even the most humble dish deserves our utmost attention, and this tuna melt wrap is no exception. This recipe is a testament to the fact that deliciousness doesn’t always require hours in the kitchen.
I often find myself reflecting on the lessons learned from my grandfather’s workshop. He taught me that true craftsmanship lies in the intentional selection of materials and the thoughtful execution of each step. That philosophy extends to the kitchen, where every ingredient and technique contributes to the final masterpiece. So, let’s approach this tuna melt wrap with the same dedication and care, transforming it from a simple snack into a culinary experience.
Why You’ll Love This Tuna Melt Wrap
There are countless reasons to fall in love with this tuna melt wrap. It’s more than just a quick fix for hunger; it’s a satisfying and flavorful meal that can be enjoyed anytime, anywhere. If you are looking for something that is both easy to make and incredibly delicious, this is the recipe for you. From the creamy tuna filling to the crispy, golden-brown tortilla, every element works in harmony to create a truly delightful experience.
- Quick and Easy: Ready in minutes, perfect for busy schedules.
- Portable: An ideal lunch for work, school, or picnics.
- Customizable: Easily adaptable to your taste preferences.
- Satisfying: Packed with protein and flavor to keep you full.
- Budget-Friendly: Uses simple, affordable ingredients.
I hope you’ll find this recipe as versatile and satisfying as I do. It’s a testament to the fact that simple ingredients, when combined with care and intention, can create something truly special. This tuna melt wrap is not just a meal; it’s a moment of culinary satisfaction, a reminder that even in the midst of our busy lives, we can find time to create something delicious and nourishing.
Ingredients You’ll Need
Let’s gather our ingredients. Remember, the quality of your ingredients will directly impact the final result. Choose the best you can find and handle them with care. This tuna melt wrap recipe is all about balance and simplicity.
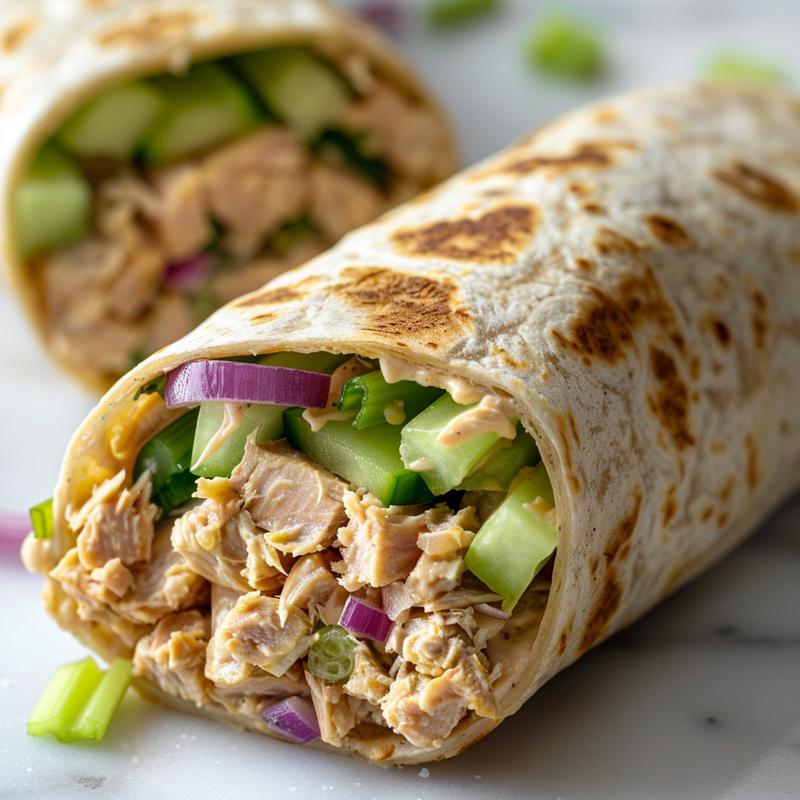
- 1 can (5 ounces) tuna, drained: The star of the show. I prefer tuna packed in water for a lighter flavor.
- 2 tablespoons mayonnaise: Adds creaminess and binds the ingredients together.
- 1 tablespoon chopped celery: Provides a refreshing crunch and subtle flavor.
- 1 tablespoon chopped red onion: Offers a sharp, pungent kick.
- Salt and pepper to taste: Essential for seasoning and enhancing the flavors.
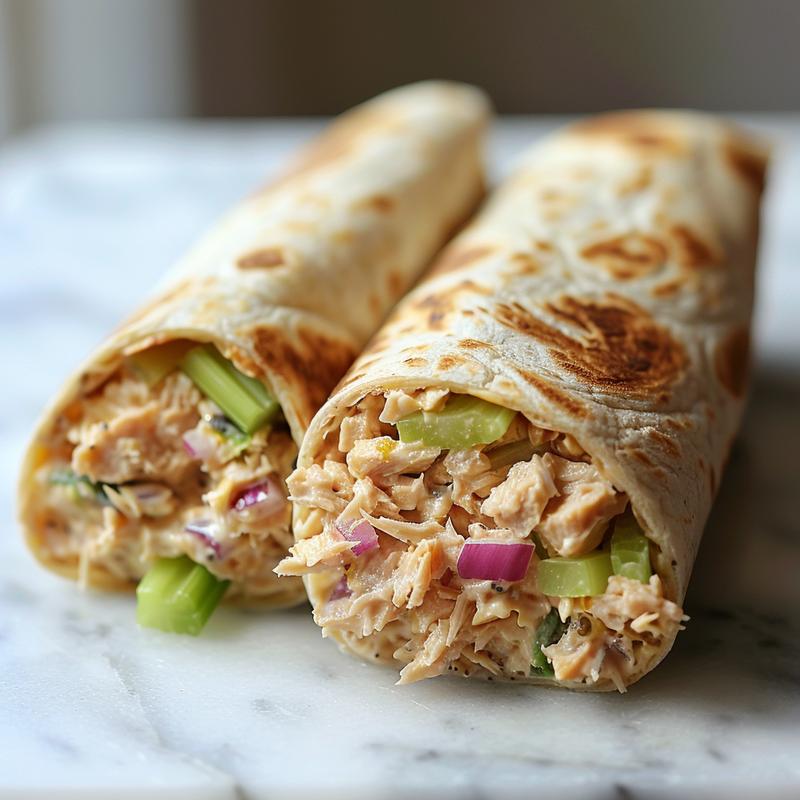
- 2 large flour tortillas: The perfect vessel for our tuna melt creation.
- 4 slices cheddar cheese: Melts beautifully and adds a rich, savory flavor.
- 1 tablespoon butter, softened: For creating that golden-brown, crispy exterior.
Below are a few notes on ingredient selection. Remember, every choice you make contributes to the final result. Don’t be afraid to experiment and find what works best for you.
Step-by-Step Instructions
Now, let’s embark on the creation process. Follow these steps carefully, and you’ll be rewarded with a perfect tuna melt wrap every time. This tuna melt wrap is a testament to the power of simple techniques.
- Prepare the Tuna Mixture: In a bowl, combine the drained tuna, mayonnaise, chopped celery, red onion, salt, and pepper. Mix well until all ingredients are evenly distributed. This is the foundation of our flavor profile.
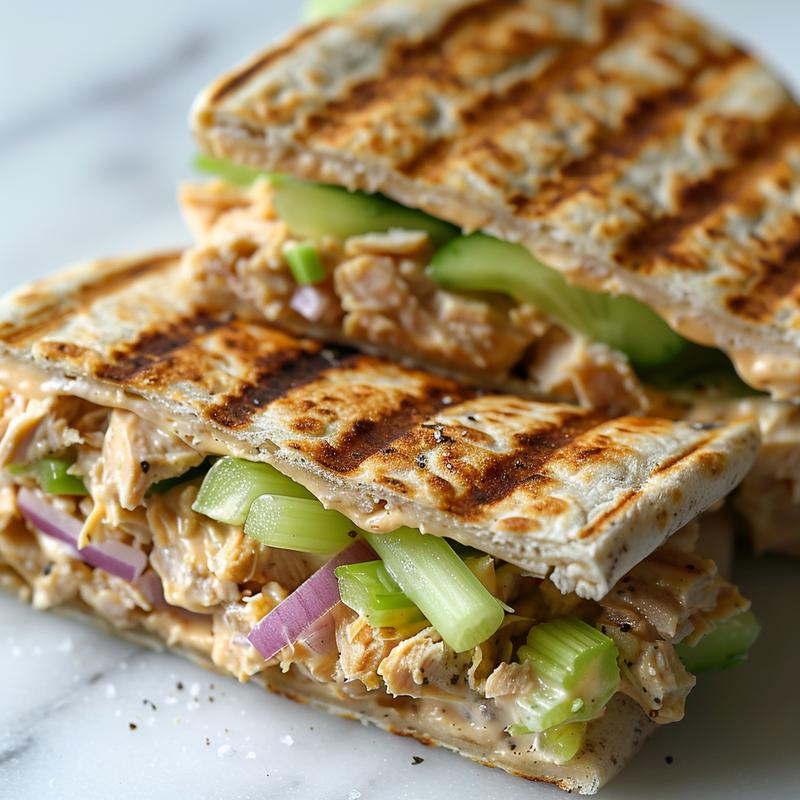
- Assemble the Wraps: Spread the tuna mixture evenly over both tortillas, leaving a small border around the edges. Top each tortilla with 2 slices of cheddar cheese, ensuring the cheese covers most of the tuna mixture. The cheese will melt and bind everything together.
- Fold and Roll: Fold in the sides of each tortilla, then roll up tightly, creating a secure and compact wrap. This will prevent the filling from spilling out during cooking.
- Butter the Wraps: Spread softened butter evenly on the outside of each wrap. This will create a golden-brown, crispy exterior when cooked.
- Cook the Wraps: Heat a skillet or griddle over medium heat. Place the buttered wraps in the skillet and cook for 2-3 minutes per side, or until golden brown and the cheese is melted and gooey. Keep a close eye on the wraps to prevent burning.
- Serve Immediately: Slice the wraps in half and serve immediately. The warm, melty cheese and crispy tortilla are best enjoyed fresh.
If you want to elevate this recipe, consider toasting the tortillas lightly before adding the filling. This will add an extra layer of texture and flavor.
Pro Tips for the Perfect Tuna Melt Wrap
To elevate your tuna melt wrap from good to extraordinary, consider these pro tips. These are the little secrets that separate the average from the exceptional.
- Don’t Overfill: Avoid overfilling the wraps, as this can make them difficult to roll and cook evenly. A moderate amount of filling is key.
- Use Room Temperature Ingredients: Using room temperature mayonnaise and butter will ensure they spread more easily and evenly.
- Press Gently While Cooking: Gently pressing down on the wraps with a spatula while cooking will help them brown evenly and melt the cheese more effectively.
- Monitor the Heat: Keep the heat at medium to prevent the tortillas from burning before the cheese has melted.
- Experiment with Cheese: Try different types of cheese, such as Monterey Jack, provolone, or pepper jack, to add different flavor profiles to your tuna melt wrap.
These pro tips are born from years of experience and experimentation. They are the subtle nuances that can transform a simple dish into a culinary masterpiece. I hope that you try to make this tuna melt wrap again and again.
Common Mistakes to Avoid
Even with the simplest recipes, mistakes can happen. Here are some common pitfalls to avoid when making your tuna melt wrap.
- Using Too Much Mayonnaise: Overdoing the mayonnaise can make the filling too soggy. Start with a small amount and add more as needed.
- Skipping the Celery and Onion: These ingredients add crucial texture and flavor. Don’t omit them unless you have a specific aversion.
- Not Draining the Tuna Properly: Excess water in the tuna can make the filling watery. Be sure to drain it thoroughly.
- Cooking at Too High a Heat: This can burn the tortillas before the cheese has melted. Medium heat is the sweet spot.
- Not Folding the Sides: Failing to fold in the sides of the tortilla will cause the filling to spill out during cooking.
Learning from mistakes is a crucial part of the culinary journey. Don’t be discouraged if your first attempt isn’t perfect. Each time you make this tuna melt wrap, you’ll refine your technique and create an even better result.
Delicious Variations to Try
The beauty of this tuna melt wrap lies in its versatility. Here are a few delicious variations to spice things up.
- Spicy Tuna Melt Wrap: Add a dash of hot sauce or a pinch of red pepper flakes to the tuna mixture for a spicy kick.
- Mediterranean Tuna Melt Wrap: Incorporate chopped olives, sun-dried tomatoes, and feta cheese for a Mediterranean twist.
- Avocado Tuna Melt Wrap: Add slices of fresh avocado to the wrap for a creamy, healthy addition.
- Pesto Tuna Melt Wrap: Spread a thin layer of pesto on the tortilla before adding the tuna mixture for an herbaceous flavor.
- Everything Bagel Seasoning Tuna Melt Wrap: Sprinkle everything bagel seasoning on the buttered tortilla before cooking for added flavor and texture.
These variations are just a starting point. Feel free to experiment and create your own unique tuna melt wrap combinations. The possibilities are endless!
How to Store Leftovers
While this tuna melt wrap is best enjoyed fresh, leftovers can be stored for later. Here’s how to do it properly.
- Refrigerate Promptly: Allow the cooked wraps to cool completely before storing them in an airtight container in the refrigerator.
- Consume Within 24 Hours: Leftover tuna melt wraps are best consumed within 24 hours to maintain their quality and prevent the filling from becoming soggy.
- Reheat Properly: Reheat the wraps in a skillet or oven until heated through. Avoid microwaving, as this can make the tortillas soggy.
Proper storage is essential for preserving the flavor and texture of your tuna melt wrap. Always follow these guidelines to ensure a safe and enjoyable eating experience.
Frequently Asked Questions (FAQ)
Here are some frequently asked questions about the tuna melt wrap.
- Can I use different types of tuna?: Yes, you can use tuna packed in oil or flavored tuna, such as lemon pepper or garlic. Just be sure to adjust the seasonings accordingly.
- Can I use different types of cheese?: Absolutely! Monterey Jack, provolone, and pepper jack are all great alternatives to cheddar.
- Can I make this wrap ahead of time?: While it’s best enjoyed fresh, you can prepare the tuna mixture ahead of time and store it in the refrigerator until ready to assemble the wraps.
- Can I grill the wraps instead of using a skillet?: Yes, grilling the wraps will add a smoky flavor. Just be sure to monitor them closely to prevent burning.
- Is tuna safe to eat?: Tuna is safe to eat in moderation. Always check in mercury levels and follow recommended guidelines for consumption.
If you have any other questions, feel free to ask in the comments section below. I’m always happy to help!
Serving Suggestions
This tuna melt wrap is a versatile dish that can be served in a variety of ways.
- With a Side Salad: A simple green salad or a Caesar salad makes a refreshing accompaniment.
- With Soup: Pair it with a bowl of tomato soup or creamy potato soup for a comforting meal.
- With Potato Chips: A classic pairing that’s always a crowd-pleaser.
- As a Snack: Cut the wrap into smaller pieces and serve it as a snack for parties or gatherings.
- On Its Own: Sometimes, the tuna melt wrap is perfect just as it is, enjoyed on its own as a quick and satisfying meal.
No matter how you choose to serve it, this tuna melt wrap is sure to be a hit. Enjoy the process of creating and savoring this delicious dish!
This tuna melt wrap is a testament to the fact that simple ingredients, when combined with care and intention, can create something truly special. It’s a reminder that even in the midst of our busy lives, we can find time to create something delicious and nourishing. I hope this recipe becomes a cherished part of your culinary repertoire, a symbol of enduring quality and intentional creation. This recipe card is below. Make this tuna melt wrap and enjoy! I love hearing from you, so don’t hesitate to leave a comment and let me know how your wraps turn out. The next time you’re looking for a quick, easy, and delicious meal, remember this tuna melt wrap. You want to check out my other recipes, too!
TUNA MELT WRAP
Ingredients
Method
- Combine tuna, mayonnaise, celery, red onion, salt, and pepper in a bowl.
- Spread tuna mixture evenly over both tortillas.
- Top each tortilla with 2 slices of cheddar cheese.
- Fold in the sides of each tortilla, then roll up tightly.
- Spread softened butter on the outside of each wrap.
- Heat a skillet or griddle over medium heat.
- Cook wraps for 2-3 minutes per side, until golden brown and cheese is melted.
- Slice in half and serve immediately.
Notes
Loved this recipe? Save it to your favorite Pinterest board so you can easily find it later! ✨