Bringing Order to the Kitchen Chaos: My Secret to Stress-Free Baking
For years, my kitchen felt like a constant battleground against the clock. As a busy professional juggling work with two energetic children, the daily question of “what’s for dinner?” often led to a frantic scramble, unhealthy takeout, and an alarming amount of wasted groceries. I remember the frustration of staring into a half-empty fridge, feeling the pressure mount as dinnertime approached. That recurring stress point was the catalyst for my journey into systematic meal planning and efficient cooking.
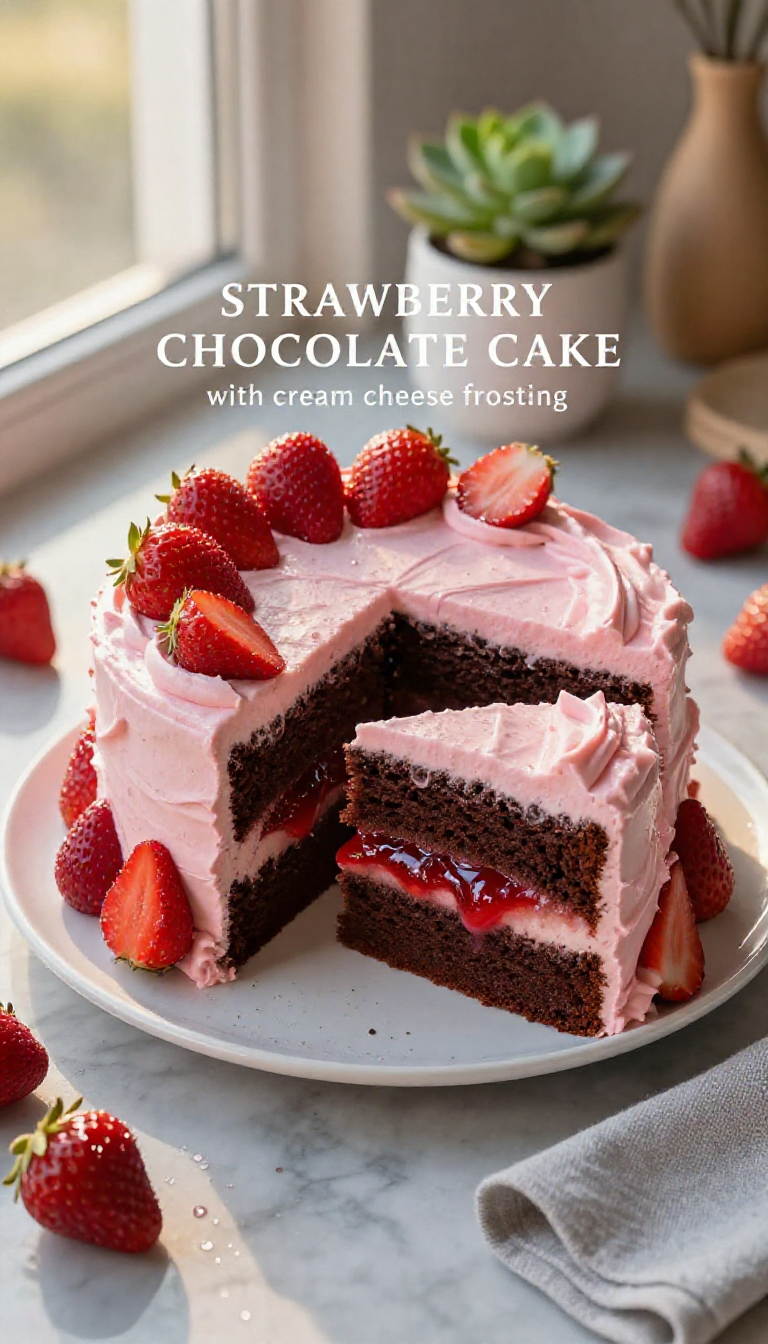
Over the last decade, I’ve meticulously developed and refined a method that transformed my family’s eating habits and, more importantly, my own peace of mind. It’s about maximizing nutrition, minimizing grocery trips, and making every ingredient work harder for you. This approach isn’t just for weeknight dinners; it extends to every aspect of kitchen life, including baking. I’ve found immense satisfaction in creating impressive, homemade treats without the usual fuss and last-minute panic. Today, I’m sharing a recipe that perfectly embodies this philosophy: a Quick & Easy Strawberry Chocolate Cake. It’s designed to deliver incredible flavor and visual appeal with practical, achievable steps, proving that even a beautiful cake can fit into a busy schedule.
This Strawberry Chocolate Cake is more than just a dessert; it’s a testament to the fact that you can have it all – a truly delicious, homemade confection that looks like it took hours, but in reality, comes together with straightforward planning and smart techniques. We’re combining moist, rich chocolate cake layers with the vibrant freshness of strawberries and a tangy cream cheese frosting. It’s a classic combination that never disappoints, and with my guidance, you’ll find the process surprisingly manageable, leaving you feeling accomplished rather than exhausted.
Table of Contents
- Why This Recipe Works for Busy Lives
- The Essential Ingredients for Your Strawberry Chocolate Cake
- Crafting Your Masterpiece: A Step-by-Step Guide
- Olivia’s Pro Tips for Baking Success
- Making It Your Own: Variations and Smart Substitutions
- Frequently Asked Questions About Strawberry Chocolate Cake
- Embracing the Process: Your Next Kitchen Achievement
Why This Recipe Works for Busy Lives
I understand the constraints of a packed schedule, and every recipe I share is vetted through the lens of practicality. This Strawberry Chocolate Cake isn’t just delicious; it’s engineered for efficiency, making it a viable option even when your calendar feels relentless. Here’s why it earns a permanent spot in my rotation:
Strategic Component Preparation: This recipe is designed to allow for staggered preparation. You can make the strawberry jam ahead of time, even a day or two in advance, which significantly reduces the active baking time on the day you assemble the cake. Similarly, the cream cheese frosting can be prepared while the cake layers are cooling, ensuring a smooth workflow. This kind of thoughtful sequencing prevents that overwhelming feeling of having too many tasks to complete simultaneously, making the entire process feel more controlled and less rushed.
Balanced Flavors and Textures: The combination of moist, tender chocolate cake, the bright acidity of fresh strawberries, and the creamy, slightly tangy cream cheese frosting creates a truly harmonious eating experience. The chocolate layers are rich without being overly dense, providing a sturdy base for the fruit and frosting. The strawberries, both in the jam and as fresh accents, cut through the richness of the chocolate and cream cheese, offering a refreshing contrast. This balance ensures that each slice is satisfying without being too heavy, making it a versatile dessert for various occasions.
Utilizes Everyday Ingredients for Impressive Results: You won’t find any obscure or hard-to-source ingredients in this recipe. We’re relying on pantry staples like all-purpose flour, cocoa powder, sugar, and basic dairy items. The magic lies in how these familiar components are combined and prepared to create something truly special. This approach reduces grocery store stress and budget strain, aligning perfectly with my philosophy of making the most of what you have on hand. It proves that you don’t need exotic items to produce a stunning, homemade cake that looks and tastes like it came from a professional bakery.
The Essential Ingredients for Your Strawberry Chocolate Cake
Gathering your ingredients systematically is the first step to a smooth baking process. Here’s what you’ll need to create this fantastic strawberry chocolate cake, broken down by component for clarity:
For the Strawberry Jam (Optional, but highly recommended for superior flavor):
- 500 g strawberries (fresh or frozen), hulled and sliced
- 50 g granulated sugar
- 1 tablespoon water
For the Moist Chocolate Cake Layers:
- 190 g all-purpose flour
- 75 g natural cocoa powder (unsweetened)
- 1 teaspoon baking powder
- 1/2 teaspoon baking soda
- 1/2 teaspoon salt
- 115 g unsalted butter, melted
- 100 g light-tasting oil (like canola or vegetable oil)
- 100 g granulated sugar
- 100 g brown sugar (light or dark, packed)
- 2 large eggs, at room temperature
- 330 g milk, at room temperature (whole milk recommended for richness)
For the Cream Cheese Frosting:
- 250 g cream cheese, softened to room temperature
- 115 g unsalted butter, softened to room temperature
- 100 g powdered sugar (confectioners’ sugar), sifted
- 70 g strawberry jam (from above, or a high-quality store-bought option)
- 1 teaspoon vanilla extract
For Garnish:
- 200 g strawberries, finely diced (fresh is best for texture and appearance)
Crafting Your Masterpiece: A Step-by-Step Guide
This section will walk you through each stage of creating your Strawberry Chocolate Cake. Read through all the steps before you begin to familiarize yourself with the process. This helps in anticipating the next move and ensures a more efficient baking experience, reducing any potential last-minute scrambles.
Part 1: Preparing the Strawberry Jam (If making from scratch)
- Combine Ingredients: In a medium saucepan, combine the hulled and sliced strawberries, granulated sugar, and water.
- Cook the Jam: Place the saucepan over medium heat. Bring the mixture to a simmer, stirring occasionally to dissolve the sugar. Once simmering, reduce the heat to low and continue to cook for 15-20 minutes, or until the strawberries have broken down and the mixture has thickened to a jam-like consistency. You can gently mash some of the berries with the back of a spoon if you prefer a smoother jam.
- Cool: Remove the jam from the heat and transfer it to a heatproof bowl or jar. Allow it to cool completely to room temperature before using. It will thicken further as it cools. Cover and refrigerate if making ahead.
Part 2: Baking the Chocolate Cake Layers
- Preheat Oven & Prepare Pans: Preheat your oven to 175°C (350°F). Grease and flour two 8-inch round cake pans, or line the bottoms with parchment paper and grease the sides. This preparation is critical for easy release and beautifully shaped cakes.
- Combine Dry Ingredients: In a large bowl, whisk together the all-purpose flour, natural cocoa powder, baking powder, baking soda, and salt. Ensure there are no lumps and the ingredients are thoroughly combined. This even distribution helps the cake rise properly.
- Combine Wet Ingredients: In a separate, medium-sized bowl, whisk together the melted unsalted butter, light-tasting oil, granulated sugar, and brown sugar until well combined and smooth. Add the room temperature eggs, one at a time, whisking well after each addition until fully incorporated. Finally, gradually whisk in the room temperature milk until the mixture is uniform. Using room temperature ingredients here is vital for a smooth batter and a consistent bake.
- Combine Wet and Dry: Pour the wet ingredient mixture into the dry ingredient mixture. Using a whisk or a rubber spatula, mix until just combined. Be careful not to overmix; overmixing can develop the gluten in the flour too much, leading to a tough, dry cake. A few small lumps are perfectly acceptable.
- Divide and Bake: Divide the cake batter evenly between the two prepared cake pans. Tap the pans gently on the counter a few times to release any large air bubbles. Bake for 28-32 minutes, or until a wooden skewer inserted into the center of the cakes comes out clean or with a few moist crumbs attached.
- Cool: Once baked, remove the cakes from the oven and let them cool in their pans on a wire rack for about 10-15 minutes. This cooling period in the pan helps the cakes firm up. Then, carefully invert the cakes onto the wire rack to cool completely. Do not attempt to frost warm cakes, as the frosting will melt and slide off.
Part 3: Preparing the Cream Cheese Frosting
- Cream Butter and Cream Cheese: In a large mixing bowl, using an electric mixer (stand mixer with paddle attachment or a handheld mixer), beat the softened cream cheese and softened unsalted butter together on medium speed until creamy and smooth. This typically takes 2-3 minutes. Ensure there are no lumps of butter or cream cheese.
- Add Remaining Ingredients: Gradually add the sifted powdered sugar to the cream cheese mixture, beating on low speed until combined, then increase to medium-high and beat until light and fluffy. Scrape down the sides of the bowl as needed. Beat in the strawberry jam and vanilla extract until fully incorporated and the frosting is smooth and uniform in color. Be careful not to overmix the frosting once the powdered sugar is added, as it can become too thin.
Part 4: Assembling the Cake
- Level Cakes (Optional): If your cake layers have domed tops, you can use a serrated knife to carefully level them, creating a flat surface for easier stacking. This step isn’t strictly necessary but contributes to a more polished appearance.
- First Layer: Place one cooled cake layer on your serving plate or cake stand. Spread about one-third of the cream cheese frosting evenly over the top of this layer.
- Add Strawberries: Scatter about half of the finely diced fresh strawberries over the frosting. Gently press them into the frosting slightly.
- Second Layer: Carefully place the second cake layer on top, pressing down gently to secure it.
- Frost the Cake: Use the remaining frosting to cover the top and sides of the entire cake, smoothing it out with an offset spatula or knife. Don’t strive for perfection; a rustic look is perfectly acceptable and charming.
- Garnish: Arrange the remaining finely diced fresh strawberries on top of the cake, or around the base, for a beautiful and refreshing garnish.
- Chill: For best results and easier slicing, refrigerate the cake for at least 30 minutes before serving. This allows the frosting to set slightly.
Olivia’s Pro Tips for Baking Success
Even with a straightforward recipe, a few expert insights can elevate your results from good to truly exceptional. These are the little tricks I’ve picked up over years of refining my baking process, ensuring consistency and minimizing potential issues.
Room Temperature is Non-Negotiable: I cannot emphasize this enough: ensure your eggs, milk, butter, and cream cheese are all at room temperature. This isn’t just a suggestion; it’s a critical step for emulsification. Cold ingredients don’t mix evenly, leading to a lumpy batter or frosting that can separate. Room temperature ingredients combine smoothly, creating a uniform mixture that bakes and sets consistently, resulting in a tender cake and a creamy, stable frosting. Planning ahead by taking these items out of the fridge an hour or two before you begin will make a significant difference in the final texture.
Do Not Overmix the Batter: Once you combine the wet and dry ingredients for the cake, mix only until just incorporated. Overmixing develops the gluten in the flour, which can lead to a dense, tough, and dry cake. We want a moist and tender crumb, so stop mixing as soon as you see no more streaks of dry flour. A few small lumps are perfectly fine and often preferred over an overmixed batter. This principle also applies to the frosting; over-beating cream cheese frosting can make it too thin.
Patience with Cooling: Resist the urge to rush the cooling process. Cakes must be completely cool before you attempt to frost them. If you frost a warm cake, the heat will melt the butter and cream cheese in your frosting, causing it to slide off and create a messy outcome. Allowing the cakes to cool fully on a wire rack ensures they are firm enough to handle and that your frosting will adhere beautifully, providing a clean and polished finish. This often means waiting at least an hour, sometimes two, depending on your kitchen’s temperature.
Prepare Your Pans Diligently: A well-prepared cake pan is your best defense against sticky situations. Always grease and flour your pans thoroughly, or line the bottoms with parchment paper and grease the sides. For chocolate cakes, I sometimes dust with cocoa powder instead of flour after greasing, to avoid any white powdery residue on the finished dark cake. This simple step ensures your beautiful cake layers release cleanly, preventing frustration and maintaining the integrity of your hard work.
Making It Your Own: Variations and Smart Substitutions
One of the aspects I appreciate most about baking is the ability to adapt recipes to suit different tastes, occasions, or dietary needs. This Strawberry Chocolate Cake recipe is a fantastic canvas for creativity. Don’t hesitate to experiment once you’ve tried the original version and understand its foundational structure.
Fruit Alternatives:
While strawberries and chocolate are a classic pair, other fruits can certainly step in. Consider raspberries for a tart contrast, or blackberries for a deeper, more earthy fruit note. In the summer, peaches or cherries could be a wonderful substitution, either as a simple diced garnish or cooked into a quick compote to replace the jam. If you’re a fan of tart fruit, you might also appreciate making an easy strawberry crisp for another refreshing dessert option.
Chocolate Intensity:
If you prefer a darker, more intense chocolate flavor, you can swap out some of the natural cocoa powder for Dutch-processed cocoa powder. Dutch-processed cocoa has a darker color and a smoother, less acidic chocolate taste. You could also fold in a handful of mini chocolate chips into the batter before baking for extra pockets of melted chocolate. For those who truly appreciate a rich, deep chocolate experience, exploring recipes like an ultimate chocolate cake might be your next adventure.
Frosting Flavors and Textures:
While the cream cheese frosting is a staple for its tang and creaminess, you can certainly modify it. For a lighter frosting, consider a whipped cream frosting, perhaps stabilized with a touch of cream cheese or gelatin, which would offer a softer texture. A classic buttercream infused with strawberry extract or even a little melted white chocolate could also be a delicious alternative. If you’re looking for other delightful mini cakes, you’ll find that many of those frosting techniques can be scaled up.
Dietary Adaptations:
- Gluten-Free: You can typically substitute the all-purpose flour with a 1:1 gluten-free baking blend that contains xanthan gum. Ensure all other ingredients are certified gluten-free.
- Dairy-Free: Use a high-quality plant-based milk (almond, soy, or oat work well) and a dairy-free butter alternative for the cake and frosting. For the cream cheese frosting, look for dairy-free cream cheese brands, which are becoming increasingly available.
- Egg-Free: While more challenging for cakes, you can experiment with flax eggs (1 tbsp ground flaxseed + 3 tbsp water per egg, let sit for 5 minutes) or commercial egg replacers. Note that the texture may vary slightly.
Remember, when making substitutions, particularly for dietary reasons, it’s often a good idea to research specific ingredient ratios or look for recipes already tailored to those modifications to ensure the best possible outcome.
Frequently Asked Questions About Strawberry Chocolate Cake
Baking can sometimes bring up a few questions, especially when you’re trying a new recipe. Here are some common queries I encounter, along with practical answers to help you navigate your baking journey with confidence.
Q: Can I prepare this Strawberry Chocolate Cake ahead of time?
A: Absolutely! This recipe is well-suited for advance preparation, which aligns perfectly with efficient meal planning. You can bake the cake layers a day or two in advance. Once completely cooled, wrap them tightly in plastic wrap and store at room temperature. The strawberry jam can be made up to a week ahead and stored in an airtight container in the refrigerator. The cream cheese frosting can also be made a day in advance and stored in an airtight container in the fridge; just be sure to let it come to room temperature and re-whip it for a minute or two before frosting the cake to restore its creamy texture. Assembled cakes are best within 2-3 days, stored in the refrigerator.
Q: How should I store the leftover cake?
A: Due to the cream cheese frosting and fresh fruit, this Strawberry Chocolate Cake should be stored in an airtight container in the refrigerator. It will maintain its best quality for 2-3 days. For optimal flavor and texture, I recommend bringing individual slices to room temperature for about 20-30 minutes before serving. This allows the cake and frosting to soften slightly, enhancing the overall eating experience.
Q: Can I use frozen strawberries instead of fresh ones for the jam and garnish?
A: Yes, you can definitely use frozen strawberries for the jam! They work wonderfully and are often more economical out of season. Simply thaw them slightly before cooking, and be aware that they might release more water, so the cooking time for the jam might be a little longer to achieve the desired consistency. For the garnish, while fresh strawberries offer the best texture and visual appeal, thawed frozen strawberries can work in a pinch. Just ensure they are well-drained to prevent excess moisture from weeping onto the frosting. When aiming for that bakery-style cookies finish, attention to ingredient quality really makes a difference, and it’s no different for cake.
Q: Why did my cake sink in the middle, or turn out dry?
A: Several factors can contribute to a sunken or dry cake. A sunken cake often results from opening the oven door too early (before the cake is set), incorrect leavening agent ratios, or an oven that’s too cool. Overmixing the batter can also lead to sinking or a dense texture. A dry cake is most commonly caused by overbaking. Every oven is different, so it’s always best to start checking for doneness a few minutes before the recipe’s minimum bake time. Using room temperature ingredients and measuring flour correctly (by weight or the spoon-and-level method) also significantly impacts moisture and texture.
Embracing the Process: Your Next Kitchen Achievement
The journey of creating something delicious from scratch is incredibly rewarding, and this Strawberry Chocolate Cake is a testament to that. It’s a recipe designed not just to produce an impressive dessert, but to empower you in the kitchen, proving that even with a busy schedule, you can craft beautiful, homemade treats. My goal is always to help you find that sweet spot where efficiency meets exceptional flavor, reducing the stress often associated with baking and cooking.
This cake is a fantastic example of a well-structured recipe that minimizes complications while maximizing impact. The combination of rich chocolate and vibrant strawberries, all brought together with a luscious cream cheese frosting, offers a truly satisfying experience for anyone who tries it. It stands as a testament to the power of thoughtful preparation and quality ingredients, transformed into something genuinely special without requiring a full day in the kitchen.
I genuinely encourage you to give this Quick & Easy Strawberry Chocolate Cake a try. Approach it with my practical tips in mind, and you’ll find the process manageable and the outcome incredibly gratifying. Whether you’re making it for a small gathering, a weeknight treat, or just because you deserve a delicious slice, it’s bound to become a staple in your baking repertoire. And once you’ve mastered this, perhaps you’ll be ready to explore other impressive bakes, like a truly decadent ultimate chocolate cake. Happy baking!
Strawberry Chocolate Cake
Ingredients
Method
- Prepare strawberry compote: Combine 500g strawberries, 50g granulated sugar, and water in a saucepan. Simmer over medium heat until thickened, about 10-15 minutes. Cool completely, then set aside 70g for the frosting.
- Make chocolate cake: Preheat oven to 175°C (350°F). Grease and flour two 8-inch round cake pans. In a large bowl, whisk together flour, cocoa powder, baking powder, baking soda, and salt. In a separate bowl, combine melted butter, oil, granulated sugar, brown sugar, eggs, and milk. Gradually add the dry ingredients to the wet ingredients, mixing until just combined. Do not overmix.
- Bake cake: Divide the batter evenly between the prepared cake pans. Bake for 30-35 minutes, or until a wooden skewer inserted into the center comes out clean. Let the cakes cool in the pans for 10 minutes before inverting them onto a wire rack to cool completely.
- Prepare frosting: In a large bowl, beat the softened cream cheese and butter with an electric mixer until light and creamy. Gradually add the powdered sugar, beating until smooth. Mix in the reserved 70g strawberry jam and vanilla extract until fully incorporated and fluffy.
- Assemble cake: Once the cake layers are completely cool, level them if necessary. Place one cake layer on a serving plate. Spread a generous layer of cream cheese frosting over the top. Pipe a frosting dam around the edge, then fill the center with finely diced strawberries and a spoonful of the remaining strawberry compote. Place the second cake layer on top and repeat the filling process.
- Frost and decorate: Frost the entire cake with the remaining cream cheese frosting, smoothing the sides and top. Decorate the top with halved fresh strawberries as desired. Chill for at least 30 minutes before serving for best results.
Notes
Loved this recipe? Save it to your favorite Pinterest board so you can easily find it later! ✨