As Olivia, a working mom of two from the Midwest, I know firsthand how challenging it can be to keep all the plates spinning. Between school pickups, work deadlines, and trying to get a nutritious dinner on the table, weeknights used to leave me completely depleted. We were stuck in a takeout rut, and the thought of tackling anything more elaborate than scrambled eggs after 6 PM felt utterly impossible. That’s when I truly embraced the absolute magic of meal prepping.
Now, my Sundays are dedicated to a couple of focused hours of chopping, roasting, and organizing. This efficient approach ensures our fridge is stocked and our weeknights are completely stress-free. It’s not just about dinners, though; it’s about having the bandwidth to make every aspect of our family life more manageable, including those special occasions that call for something truly spectacular. And trust me, nothing says ‘spectacular’ quite like a beautifully crafted, elegant floral dessert without the last-minute panic.
Crafting Calm in the Kitchen: My Secret to Stress-Free Special Occasions
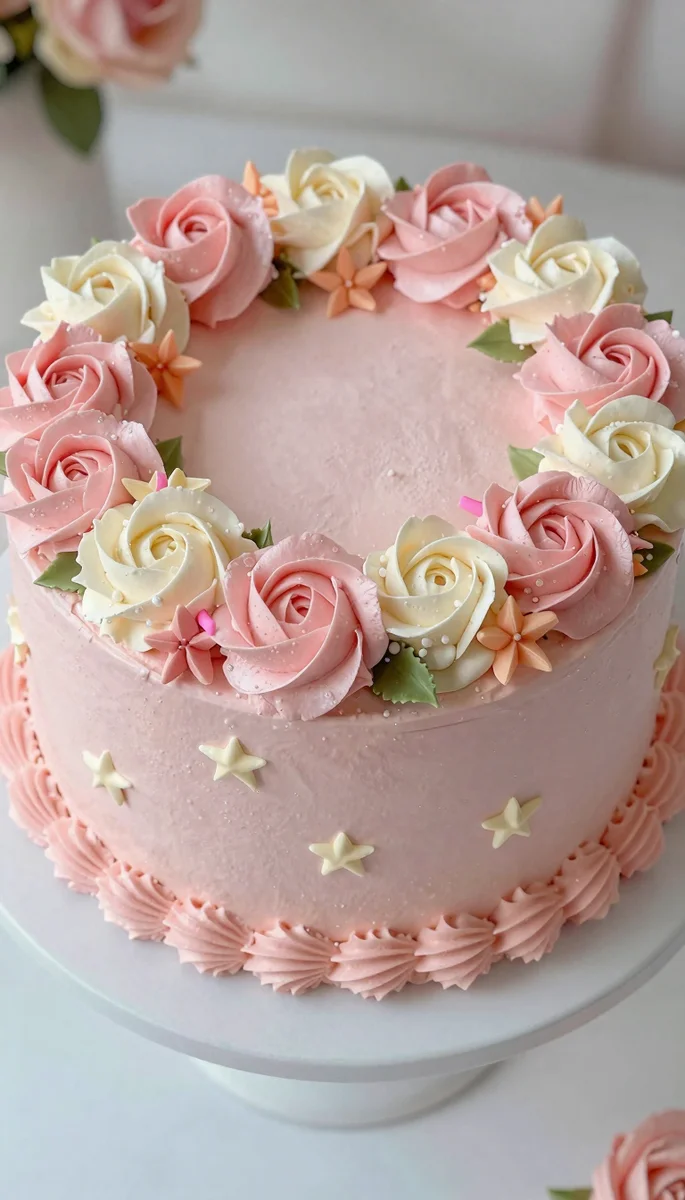
You might think an intricate-looking dessert like this Blush Pink Rose Cake is reserved for professional bakers or those with endless free time. But I’m here to tell you that with a little bit of my signature organized planning, even a busy mom like me can pull off this stunning pink cake. This recipe is a testament to how realistic, budget-friendly meal prep principles can extend beyond just savory meals and transform your baking projects into truly enjoyable, stress-free experiences. Imagine the sheer satisfaction of presenting such a delicate, romantic dessert, knowing you weren’t frantic moments before guests arrived. That’s the power of being prepared, even when creating an exquisite baking recipe.
This particular rose cake is a dream, not just in its ethereal appearance and delicate rose water flavor, but in how achievable it is when approached systematically. It embodies everything I strive for in my kitchen: efficiency, beautiful results, and allowing more time for what truly matters – being present with my family. Let’s dive into how you can bring this exquisite layer cake to your table with ease and confidence.
Table of Contents
- Crafting Calm in the Kitchen: My Secret to Stress-Free Special Occasions
- The Efficiency Behind This Elegant Floral Dessert
- Your Shopping List for a Delicate Rose Water Cake
- Mastering the Blush Pink Rose Cake: An Organized Approach
- Olivia’s Expert Advice for a Flawless Pink Cake
- Customizing Your Elegant Cake: Beyond the Blush
- Your Blush Pink Rose Cake Questions Answered
- Embrace the Art of Prepared Baking
The Efficiency Behind This Elegant Floral Dessert
Every recipe I bring into my home has to earn its spot, especially when it comes to special projects. This Blush Pink Rose Cake passes the test with flying colors because it’s designed for efficiency and delivers maximum impact for manageable effort. Here’s why this particular baking recipe is a winner:
Stunning Presentation, Manageable Effort: Don’t let the elegant appearance fool you. While it looks incredibly sophisticated, the techniques involved in creating this rose cake are straightforward and accessible for most home bakers. The layering, the simple syrup, and the smooth buttercream frosting are all achievable steps that contribute to its grand aesthetic without requiring advanced skills. This makes it a perfect special occasion cake that truly impresses.
Budget-Friendly Ingredients, Premium Outcome: One of my core principles is making gourmet experiences accessible without breaking the bank. This pink cake relies on common pantry staples like flour, sugar, eggs, and butter, with the star, rose water, being an affordable specialty item that provides incredible flavor and aroma. You get a truly luxurious, romantic dessert experience using ingredients that won’t strain your weekly grocery budget. It’s a testament to how careful selection can yield a premium outcome.
Perfect for Batch-Cooking Components: This is where my meal-prepping philosophy truly shines for baking. The cake layers for this rose cake can be baked ahead of time and frozen, the rose simple syrup can be prepared days in advance and stored in the fridge, and even the buttercream can be made and chilled. This allows for efficient “batch-cooking” of components, meaning you can spread out the work over a few days. When it’s time to assemble, most of the heavy lifting is already done, making the final stages completely stress-free. Properly stored in good “tupperware,” your components will stay fresh and ready.
Your Shopping List for a Delicate Rose Water Cake
Having all your ingredients ready and measured before you begin is a cornerstone of organized baking. This “mise en place” approach ensures a smooth process and helps prevent any last-minute scrambling. Here’s what you’ll need to create this beautiful rose cake:
For the Rose Cake Layers:
- 2 ½ cups (300g) all-purpose flour, sifted
- 1 tablespoon baking powder
- ½ teaspoon salt
- 1 cup (226g) unsalted butter, softened
- 2 cups (400g) granulated sugar
- 4 large eggs, at room temperature
- 1 teaspoon vanilla extract
- 1 cup (240ml) whole milk, at room temperature
- 1 tablespoon food-grade rose water
- 2-3 drops pink gel food coloring (optional, for a subtle blush)
For the Rose Simple Syrup:
- ½ cup (100g) granulated sugar
- ½ cup (120ml) water
- 1 teaspoon food-grade rose water
For the Rose Buttercream Frosting:
- 1 ½ cups (340g) unsalted butter, softened
- 6-8 cups (700-900g) powdered sugar, sifted
- ¼ cup (60ml) whole milk or heavy cream, plus more if needed
- 2 teaspoons vanilla extract
- 1-2 teaspoons food-grade rose water (to taste)
- 4-6 drops pink gel food coloring
- Pinch of salt
For Garnish (Optional):
- Fresh, food-safe rose petals
- Edible glitter
Mastering the Blush Pink Rose Cake: An Organized Approach
Creating this elegant cake is a structured process, and following these steps will ensure a beautiful and delicious outcome. Remember, preparation is key for a stress-free baking experience!
Prepare Your Workspace and Pans: Preheat your oven to 350°F (175°C). Grease and flour three 8-inch round cake pans, or line with parchment paper circles. This essential first step ensures your layers release cleanly. Gather all your measured ingredients, ensuring butter, eggs, and milk are at room temperature. This significantly impacts the texture of your cake.
Combine Dry Ingredients: In a medium bowl, whisk together the sifted all-purpose flour, baking powder, and salt. Sifting prevents lumps and ensures an even distribution of leavening agents, crucial for a light and airy cake structure.
Cream Butter and Sugar: In a large mixing bowl, using an electric mixer, cream the softened unsalted butter and granulated sugar together on medium-high speed until the mixture is light, fluffy, and pale in color. This process incorporates air, which contributes to the cake’s rise and tender crumb. This step typically takes 3-5 minutes.
Add Eggs and Extracts: Beat in the large eggs one at a time, ensuring each egg is fully incorporated before adding the next. Scrape down the sides of the bowl as needed. Stir in the vanilla extract and 1 tablespoon of food-grade rose water. If using, add 2-3 drops of pink gel food coloring here to achieve a subtle blush in your cake layers. Mix until just combined.
Alternate Dry and Wet Ingredients: With the mixer on low speed, gradually add the dry ingredient mixture to the wet ingredients, alternating with the whole milk. Begin and end with the dry ingredients (e.g., add ⅓ dry, then ½ milk, then ⅓ dry, then ½ milk, then ⅓ dry). Mix only until just combined after each addition. Overmixing at this stage can lead to a tough cake.
Bake the Cake Layers: Divide the batter evenly among the three prepared cake pans. Bake for 22-28 minutes, or until a wooden skewer inserted into the center of a cake comes out clean. The exact baking time may vary based on your oven, so keep a close watch. Allow the cakes to cool in the pans for 10-15 minutes before inverting them onto a wire rack to cool completely. Ensure they are entirely cool before moving to the next steps.
Prepare the Rose Simple Syrup: While the cakes are cooling, combine ½ cup granulated sugar and ½ cup water in a small saucepan. Bring to a simmer over medium heat, stirring until the sugar is completely dissolved. Remove from heat and stir in 1 teaspoon of food-grade rose water. Let the syrup cool completely to room temperature. This can be made ahead and stored in an airtight container in the refrigerator.
Make the Rose Buttercream Frosting: In a large mixing bowl, beat the softened unsalted butter on medium speed for 2-3 minutes until light and creamy. Gradually add the sifted powdered sugar, 1 cup at a time, mixing on low speed until combined, then increasing to medium-high. Add ¼ cup whole milk or heavy cream, 2 teaspoons vanilla extract, 1-2 teaspoons food-grade rose water (adjust to your preference), and a pinch of salt. Beat on high speed for 3-5 minutes until the buttercream is light, fluffy, and smooth. Add 4-6 drops of pink gel food coloring until you achieve your desired blush shade. If the frosting is too thick, add more milk, 1 teaspoon at a time. If too thin, add more powdered sugar.
Assemble the Cake: Once the cake layers are completely cool, use a serrated knife to level the tops of each cake layer if needed, creating a flat surface for stacking. Place one cake layer on your serving platter or cake stand. Brush generously with the cooled rose simple syrup. Spread about ¾ cup of rose buttercream evenly over the top. Repeat with the second cake layer, syrup, and frosting. Place the final cake layer on top and brush with syrup.
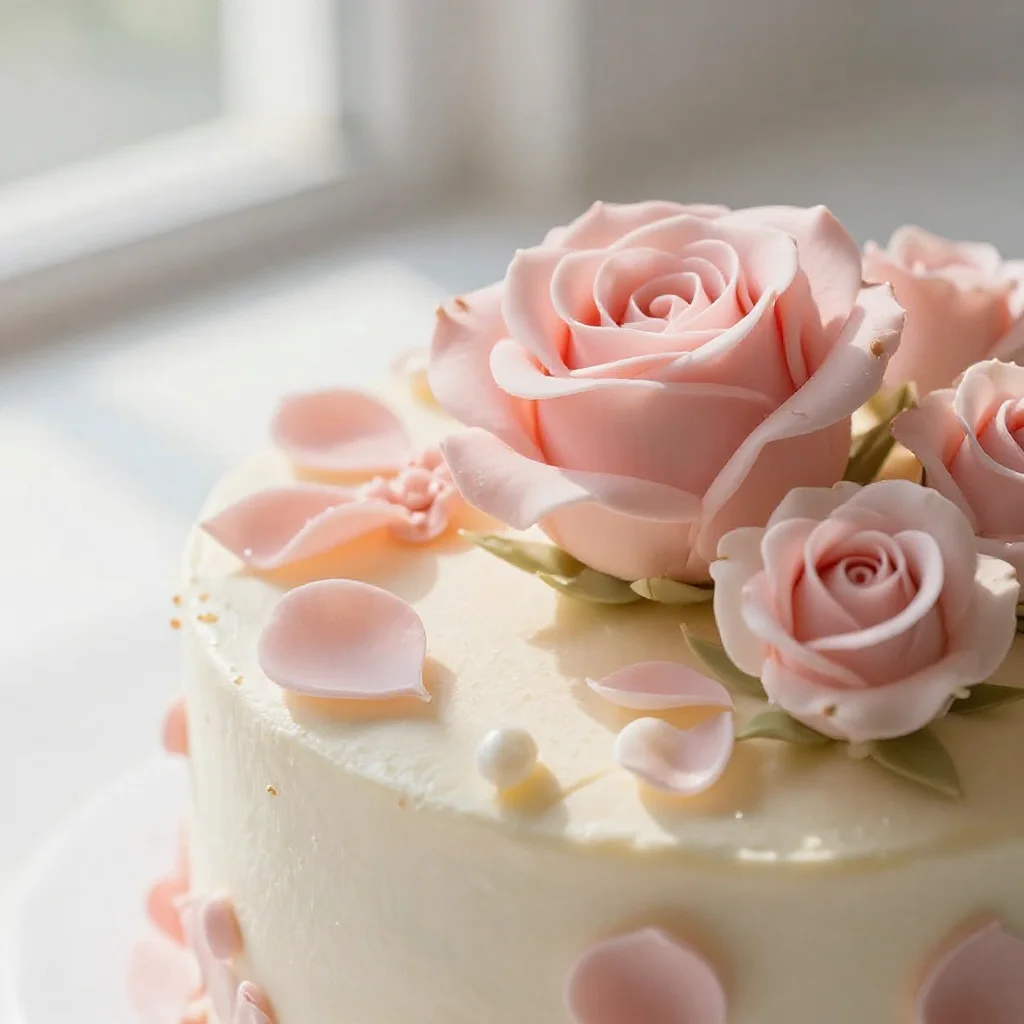
Crumb Coat and Final Frosting: Apply a thin layer of buttercream all over the entire cake – this is your crumb coat. It traps any loose crumbs, ensuring your final frosting layer is smooth and pristine. Chill the cake in the refrigerator for 20-30 minutes to set the crumb coat. Once chilled, apply the remaining buttercream frosting evenly around the sides and top of the cake, using an offset spatula or bench scraper to achieve a smooth finish. For a decorative touch, pipe rosettes or swirls on top with a star tip.
Garnish and Serve: Garnish your elegant floral dessert with fresh, food-safe rose petals or edible glitter, if desired. This adds a final, exquisite touch. Allow the cake to sit at room temperature for about 15-20 minutes before slicing and serving, to ensure the buttercream is soft and creamy.
Olivia’s Expert Advice for a Flawless Pink Cake
Achieving a bakery-worthy cake at home is completely within reach with a few strategic insights. As someone who relies on efficiency, these pro tips are designed to make your baking journey smoother and your results more spectacular, ensuring your rose cake is truly perfect:
Room Temperature Ingredients are Non-Negotiable: This might sound like a minor detail, but it’s absolutely crucial for the success of your cake and frosting. Room temperature butter, eggs, and milk emulsify properly, creating a smooth, uniform batter that bakes evenly and yields a tender crumb. Cold ingredients can lead to a lumpy batter and a dense cake. Plan ahead by taking them out of the refrigerator at least an hour before you start baking.
Do Not Overmix Your Batter: Once you add the flour mixture, mix only until the ingredients are just combined. Overmixing develops the gluten in the flour, which can result in a tough, chewy cake rather than the delicate, light texture you’re aiming for. Use a low speed on your mixer and stop as soon as you see no more streaks of dry ingredients.
The Crumb Coat is Your Best Friend: For that smooth, professional finish on your elegant cake, a crumb coat is essential. It’s a thin layer of frosting applied to the entire cake after assembly, which traps any loose crumbs. Once chilled and firm, it creates a perfectly clean canvas for your final, thicker layer of frosting. Don’t skip this step – it’s a game-changer for presentation.
Chill Time is Your Ally: Utilizing your refrigerator strategically throughout the process can make cake assembly significantly more stress-free. Chill your cake layers after leveling, after the crumb coat, and even after the final frosting if you need to firm it up for intricate decorating. Cold cake layers are much easier to handle, stack, and frost without tearing or shifting. For those who embrace “batch-cooking,” chilling components in good “tupperware” is part of the overall plan.
Customizing Your Elegant Cake: Beyond the Blush
While the Blush Pink Rose Cake is stunning as is, part of the fun of baking is making a recipe truly your own. Don’t hesitate to experiment with these variations and substitutions to fit your preferences or the occasion. Remember, organized experimentation can lead to wonderful new discoveries, and having a plan makes it stress-free.
Color Creations: Instead of blush pink, consider other pastel shades. A soft lavender could be achieved with a tiny drop of purple food coloring, or a gentle mint green with green gel. You could even omit food coloring entirely for a pristine white rose cake, which is equally elegant. For more floral dessert ideas, consider colors that match specific flower types.
Flavor Enhancements: While rose water is the star, you can introduce complementary flavors. A hint of cardamom or pistachio extract in the cake batter or buttercream can add another layer of sophistication. For a different fruit profile, a cherry cake delight could inspire you to add cherry extract alongside the rose, or even fold in finely chopped dried cherries to the batter.
Garnish Alternatives: Beyond fresh rose petals, consider candied violets, edible silver or gold leaf for extra sparkle, or even delicate fresh berries like raspberries or strawberries. A light dusting of powdered sugar just before serving also creates a beautiful, ethereal effect.
Dietary Adjustments: For those with dietary restrictions, this baking recipe can be adapted. Use a high-quality gluten-free all-purpose flour blend (one that contains xanthan gum) as a 1:1 substitute. For a dairy-free option, use plant-based butter sticks and plant-based milk (like almond or oat milk) in both the cake and buttercream. Keep in mind that texture might vary slightly. If a lighter, simpler option is preferred for a specific dietary need, an easy tea cake recipe might be a good alternative.
Your Blush Pink Rose Cake Questions Answered
I know that embarking on a new baking recipe, especially for a special occasion, often comes with questions. Here are some of the most common inquiries I receive about making elegant cakes, with practical, organized answers to ensure your rose cake experience is completely stress-free.
Q: Can I make this rose cake ahead of time?
A: Absolutely! This recipe lends itself perfectly to my “batch-cooking” philosophy. The cake layers can be baked, cooled completely, wrapped tightly in plastic wrap, and frozen for up to 2-3 weeks. Thaw them in the refrigerator overnight before assembling. The rose simple syrup can be made up to a week in advance and stored in an airtight container in the fridge. The buttercream can also be made 3-4 days ahead, stored in an airtight “tupperware” in the refrigerator, then brought to room temperature and re-whipped before use. This advanced preparation makes the final assembly incredibly efficient and stress-free.
Q: What kind of rose water should I use for this elegant cake?
A: It is critically important to use food-grade rose water, which is specifically manufactured for culinary use. Do NOT use rose water intended for cosmetic purposes, as it is not safe for consumption. You can typically find food-grade rose water in specialty grocery stores, Middle Eastern markets, or online. Brands like Nielsen-Massey or Cortas are generally reliable choices for quality and flavor in a baking recipe.
Q: How do I achieve that perfect blush pink color in my pink cake?
A: For the most controlled and vibrant color, I highly recommend using gel food coloring over liquid dyes. Gel colors are highly concentrated, so you only need a tiny amount to achieve a beautiful hue without thinning your batter or frosting. Start with just one or two drops, mix thoroughly, and then add more sparingly until you reach your desired blush shade. It’s much easier to add more color than to remove it!
Q: What if my buttercream is too thin or too thick?
A: Buttercream consistency is key for easy spreading and piping. If your buttercream is too thin, it likely needs more powdered sugar. Add it gradually, ¼ cup at a time, beating well after each addition until it reaches the desired thickness. If it’s too thick and stiff, add more liquid (milk or heavy cream), 1 teaspoon at a time, mixing until smooth and spreadable. Temperature also plays a role; if your kitchen is very warm, the buttercream might soften quickly, so don’t hesitate to chill it briefly if needed.
Embrace the Art of Prepared Baking
There you have it – my comprehensive guide to creating a truly exquisite Blush Pink Rose Cake. This isn’t just a baking recipe; it’s an example of how a little forethought and organized effort can transform what might seem like a daunting task into a rewarding and stress-free experience. As a working mom, I’ve learned that preparation is the ultimate tool for reclaiming my evenings and ensuring my family gets nourishing meals and, yes, even these beautiful special occasion desserts.
This elegant floral dessert is more than just a treat; it’s a testament to the power of structured planning and efficient kitchen habits. By breaking down the process into manageable steps and utilizing the magic of “batch-cooking” and smart “tupperware” storage, you can have a stunning rose cake ready without the last-minute scramble. Imagine the proud moment of presenting this delicate pink cake, knowing you crafted it with care and calm, leaving you ample time to truly savor the moment with your loved ones.
I genuinely hope this detailed guide empowers you to try this truly magnificent baking recipe. Give this Blush Pink Rose Cake a try for your next special occasion dessert, and discover the immense satisfaction of prepared baking. You’ll find that a little organization goes a long way, opening up your evenings for what truly matters and allowing you to create beautiful memories, one perfectly planned slice at a time.
”
}

Pink Princess Strawberry Rose Cake
Ingredients
Method
- Preheat oven to 350°F (175°C). Grease and flour two 8-inch round cake pans.
- In a large bowl, whisk together flour, sugar, baking powder, and salt. In another bowl, combine milk, oil, vanilla, and eggs. Add wet ingredients to dry, mixing until just combined. Stir in pink food coloring if desired.
- Divide batter evenly between prepared pans. Bake for 25-30 minutes, or until a toothpick inserted into the center comes out clean. Let cool in pans for 10 minutes, then invert onto a wire rack to cool completely.
- For the frosting, beat softened butter until creamy. Gradually add powdered sugar, rose water, and milk/cream, beating until light and fluffy. Add pink food coloring if desired.
- Once cakes are completely cool, level the tops if necessary. Place one cake layer on a serving plate. Spread a layer of frosting, then arrange sliced strawberries on top. Place the second cake layer on top and frost the entire cake.
- Garnish with remaining fresh strawberries and edible rose petals, if using. Serve immediately or refrigerate.
Notes
Loved this recipe? Save it to your favorite Pinterest board so you can easily find it later! ✨